SCIFIT

Upper Body Exerciser

PRO1/PRO1 SPORT

Machine Owner's Manual

ALL PRO1 SERIES MODELS

A6568 CC

Cover Image

i Corporate Headquarters

  • Columbia Centre III, 9525 Bryn Mawr Avenue, Rosemont, IL 60018 • U.S.A.
  • 847.288.3300 • FAX: 847.288.3703
  • Service phone number: 800.351.3737 (toll-free within U.S.A., Canada)
  • Global Website: www.lifefitness.com
International Offices

AMERICAS

North America

SCIFIT

EUROPE, MIDDLE EAST, and AFRICA (EMEA)

Belgium, Netherlands, and Luxemburg

Life Fitness (Atlantic) B.V.

All Other EMEA Countries and Distributor Business EMEA*

Life Fitness (Atlantic) B.V.

Brazil

Life Fitness Brasil

United Kingdom

Life Fitness UK LTD

ASIA PACIFIC (AP)

Japan

Life Fitness Japan, Ltd

Latin America and Caribbean*

Life Fitness, LLC

Germany, Austria, and Switzerland

Life Fitness Europe GMBH

Hong Kong

Life Fitness Asia Pacific LTD


Spain

Life Fitness IBERIA

All Other Asia Pacific countries and distributor business Asia Pacific*

Life Fitness Asia Pacific LTD

*Also check www.SCIFIT.com for local representation or distributor/dealer

* Order online 24/7 at www.SCIFIT.com

ii User and Service Documents Link

https://lfn.fit/KnowledgeBase

https://lfn.fit/PartStore

Additional information is available online using the links above.

English

.تتوفر معلومات إضافية على الإنترنت باستخدام الرابط أعلاه

Arabic, Saudi Arabia, Primary

点击上面的链接可在线获取更多信息。

Chinese, Simplified, Primary

Flere oplysninger er tilgængelige online gennem linket ovenfor.

Danish

Bijkomende informatie is online beschikbaar via bovenstaande link.

Dutch

Vous trouverez plus d'informations en ligne à l'aide du lien ci-dessus.

French

Zusätzliche Informationen finden Sie online über den oben angegebenen Link.

German

Ulteriori informazioni sono disponibili online utilizzando il link sopra riportato.

Italian

追加情報は上記リンクを使用してオンラインで利用可能です。

Japanese

상기 링크를 통해 온라인에서 추가 정보를 볼 수 있습니다.

Korean

Informações adicionais estão disponíveis on-line, através do link acima.

Portuguese, Brazil, Primary

Дополнительная информация доступна в интернете по ссылке, указанной выше.

Russian

Mediante el enlace anterior podrá acceder a información adicional en línea.

Spanish

Ytterligare information finns online genom att använda länken ovan.

Swedish

İnternet üzerinden daha fazla bilgi edinmek için yukarıdaki bağlantıyı kullanabilirsiniz.

Turkish

.هناك معلومات إضافية متاحة على الإنترنت باستخدام الرابط أعلاه

Arabic,Standard, Secondary

Informazio osagarria eskuragarri dago goiko estekaren bidez.

Basque

Допълнителна информация можете да намерите онлайн, като използвате връзката по-горе.

Bulgarian

Mitjançant l'enllaç anterior podreu accedir a informació addicional en línia.

Catalan

使用上面的連結線上提供額外資訊。

Chinese, Traditional, Secondary

Dodatne informacije možete pronaći na internetu sljedeći vezu iznad.

Croatian

ከላይ የተቀመጠውን አገናኝ(ሊንክ) በመጠቀም መረጃዎች ኦንላይን ያገኛሉ፡፡

Ethiopian

Lisätietoja on saatavissa verkosta käyttämällä yllä olevaa linkkiä.

Finnish

Wubetumi anya nsɛm afoforo aka ho wɔ wɛbsait so denam asɛm a ɛwɔ atifi hɔ a wubemia so so.

Ghana

Πρόσθετες πληροφορίες είναι διαθέσιμες ονλάιν χρησιμοποιώντας το σύνδεσμο παραπάνω.

Greek

.מידע נוסף אפשר לקבל באינטרנט באמצעות הקישור לעיל

Hebrew

További információ elérhető online, a fenti hivatkozás segítségével.

Hungarian

Viðbótarupplýsingar eru fáanlegar á netinu með því að smella á tengilinn hér fyrir ofan.

Icelandic

Plus indicium per superum situm potes invenire.

Latin

മുകളിലുള്ള ലിങ്ക് ഉപയോഗിച്ച് ഓൺലൈനിൽ കൂടുതല് വിവരങ്ങൾ ലഭ്യമാണ്.

Malayalam

Ytterligere informasjon er tilgjengelig på nettet via linken ovenfor.

Norwegian Nyorsk

Dodatkowe informacje są dostępne online pod powyższym odnośnikiem.

Polish

Informações adicionais estão disponíveis online a usar o link acima.

Portuguese, Portugal, Secondary

Informații suplimentare sunt disponibile online, utilizând link-ul de mai sus.

Romanian

Dodatne informacije dostupne su na mreži putem gornjeg linka.

Serbian

Ďalšie informácie sú dostupné online na vyššie uvedenom odkaze.

Slovak

Chapter 1: Safety

1.1: Introduction

FCC Warning - Possible Radio / Television Interference
This equipment has been tested and found to comply with the limits for a Class A digital device, pursuant to part 15 of the FCC rules. These limits are designed to provide reasonable protection against harmful interference when the equipment is operated in a commercial environment. This equipment generates, uses and can radiate radio frequency energy, and if not installed and used in accordance with the instruction manual, may cause harmful interference to radio communications. Operation of this equipment in a residential area is likely to cause harmful interference in which case the user will be required to correct the interference at his own expense.

1.2: Safety Information

Danger: To reduce the risk of electrical shock or injury from moving parts, always unplug the machine before cleaning or attempting any maintenance activity.
Warning: Health-related injuries may result from incorrect or excessive use of exercise equipment. It is STRONGLY recommended seeing a physician for a complete medical exam before undertaking an exercise program, particularly if the user has a family history of high blood pressure or heart disease, is over the age of 45, smokes, has high cholesterol, is obese, or has not exercised regularly in the past year. If, at any time while exercising, the user experiences faintness, dizziness, pain, or shortness of breath, he or she must stop well immediately.
Warning: To reduce the risk of burns, fire, electrical shock, or injury, it is imperative to connect each product to a properly grounded electrical outlet.
Warning: Heart rate monitoring systems may be inaccurate. Over exercising may result in serious injury or death. If you feel faint, stop exercising immediately.
Warning: Allow a distance of 40 in. (1m) between the widest part of the machine and other objects on either side. Provide 40 in (1m) between the front or rear of the SCIFIT machine to any other objects.
Warning: This product can expose you to chemicals including Ethylbenzene, which is known to the State of California to cause cancer, and Toluene, which is known to the State of California to cause birth defects or other reproductive harm. For more information go to http://www.P65Warnings.ca.gov
Caution: Any changes or modifications to this equipment could void the product warranty.
  • Life Fitness does not warrant nor guarantee that component parts used in the manufacture of products offered under the Life Fitness brand are latex-free. Users of these products must take all necessary precautions to prevent accidental contact that could lead to an adverse latex reaction.
  • Read all warnings and instructions on each product prior to using your exercise machine. Save these instructions for future reference.
  • If warnings are missing or damaged, please contact customer service immediately for replacement warning labels. Warning labels are shipped with every product and should be installed before the product is used. SCIFIT is not responsible for missing or damaged warning labels.
  • Use the exercise machine only for its intended purposes as described in this manual. Do not use attachments not recommended by the manufacturer.
  • Never insert objects into any opening in these products. If an object should drop inside, turn off the power, unplug the power cord from the outlet, and carefully retrieve it. If the item cannot be reached, contact customer support services..
  • This machine is intended for indoor use only. Do not place in direct sunlight, high humidity or where water is present (i.e. pool or spa areas).
  • This machine is not intended for use by persons with reduced physical sensory or mental capabilities, or lack of experience and knowledge, unless they have been given supervision or instruction concerning use of the machine by a person responsible for their safety. Keep children under the age of 14 away from this machine.
  • Never operate the machine with the air openings blocked. Keep air openings free of lint, hair, or any other obstructing material.
  • Never place liquids of any type directly on the unit, except in an accessory tray or holder. Containers with lids are recommended. Do not use these products in bare feet. Always wear shoes. Wear shoes with rubber or high-traction soles. Do not use shoes with heels, leather soles, cleats or spikes. Make sure no stones are embedded in the soles.
  • Keep all loose clothing, shoelaces, and towels away from moving parts.
  • Do not reach into, or underneath, the unit or tip it on its side during operation.
  • Do not allow other people to interfere in any way with the user or equipment during a workout.
  • When the product is not in use, SCIFIT recommends unplugging the product. Disconnect from the electrical outlet when not in use, and before putting on or taking off parts.
  • Free standing equipment shall be installed on a stable and leveled surface.
  • Do not stand or sit on plastic shrouds.
  • Use caution when mounting or dismounting the machine. Use the stationary handlebar whenever additional stability is required.

Machine Safety Perimeter

PRO1 Seated

PRO1 Sport

Chapter 2: Product Overview

2.1: Product Overview

PRO1 Seated

1 GEN4 Console
2 Main Body Angle Positioning Lever
3 Adjustable Crank Arms
4 Ergonomic Seat Assembly (Premium Shown)
5 Forward/Backward Seat Adjustment Foot Lever
6 Molded Foot Rest
7 Leveling Endcaps
8 Transport Wheels
9 Water Bottle Holder

PRO1 Sport

1 GEN4 Console
2 Main Body Angle Positioning Lever
3 Adjustable Crank Arms
4 Molded Platforms
5 Leveling Endcaps
6 Transport Wheels
7 Water Bottle Holder

Chapter 3: Service and Technical Data

3.1: Maintenance

Component Action When
Upholstery Clean With a Damp Cloth Daily
Base Roller Track Clean With a Damp Cloth Weekly
Battery Refer to “Rotary CNSL Prog. Manual” For battery Check Instruct. Monthly
Chain General Purpose Chain Lubricant Every 6 Mo.

Attention: Contact your local waste management agency for specific requirements concerning recycling and disposal locations of batteries.

Chapter 4: Assembly and Relocation

4.1: PRO1 Seated Assembly

Short assembly steps will be required when the PRO1 Seated machine arrives. The following will show how to assembly the machine.
Tools Required:
  • Torque wrench set 48 ft-lbs/65 Nm
  • 12"/30.5 cm Ratchet extension
  • Long Center Punch
  • Ratchet
  • 5/16"/8 mm Allen hex bit
  • Cordless Drill W/Phillips Bit or Phillips Screw Driver
Parts Required:
  • Washer, Flat 3/8" (Qty. 4)
  • Washer, Split 3/8" (Qty. 4)
  • Screw, 3/8"-16 x 1" Socket (Qty. 4)
  • Screw, M5 x 12mm Phil Black (Qty. 4)
  • PRO1 to PRO2 Base Spacer (Qty. 2)
  1. The PRO1 Seated machine will be received as shown and will need the pivot hardware at the front of the base frame removed, then placed to the side using a ratchet, 12" ratchet extension and 5/16" hex bit.
  2. Warning: It is highly recommended that two people are used for the following steps.
    Carefully lift and place the mast in front of the round cross tube and in-between the front square tubes.
  3. While the second person is still holding the main unit and mast, place a PRO1 to PRO2 Base spacer on the left and right side between the mast and the square tube weldments as shown.
  4. Attention: Second person should still be holding the main unit and mast.
    Starting on the right side insert a center punch through the spacer and into the mast in the hole nearest to the round cross tube, then use a ratchet extension with attached 5/16" hex bit and loosely insert a 3/8-16 x 1" socket screw, 3/8" split washer and 3/8" flat washer into the front hole nearest the transport wheels through the spacer and into the mast as shown.
  5. Remove the center punch and again use a ratchet extension with attached 5/16" hex bit and loosely insert a 3/8-16 x 1" socket screw, 3/8" split washer and 3/8" flat washer into the hole where the center punch was located as shown.
  6. Attention: The second person will no longer need to hold the main unit and mast.
    Go to the left side and continue to loosely insert a 3/8-16 x 1" screw, 3/8" split washer and 3/8" flat washer into the front and rear holes through the spacer into the mast. NOTE: Any additional packaging may be removed from the machine at this time.
  7. Starting on the left side, then the right use a torque wrench set at 48 ft-lbs/ 65 Nm, 12" ratchet extension and 5/16" hex bit to tighten and secure the mast to the base frame.
  8. Rotate the console mounting bracket upward, then insert the machine communication cable to the RJ45 connector on the back of the console.
  9. Use a phillips screw driver or cordless drill with attached phillips bit to secure the console to the mounting bracket with (Qty. 4) M5 x 12mm Phil Black Zinc screws.
    The machine is now ready to be moved to the customer preferred location.

4.2: PRO1 Seated Relocate

  1. Remove the seat by pressing down on either left or right yellow foot levers and hold, then slide the seat assembly off the base frame and place to the side.
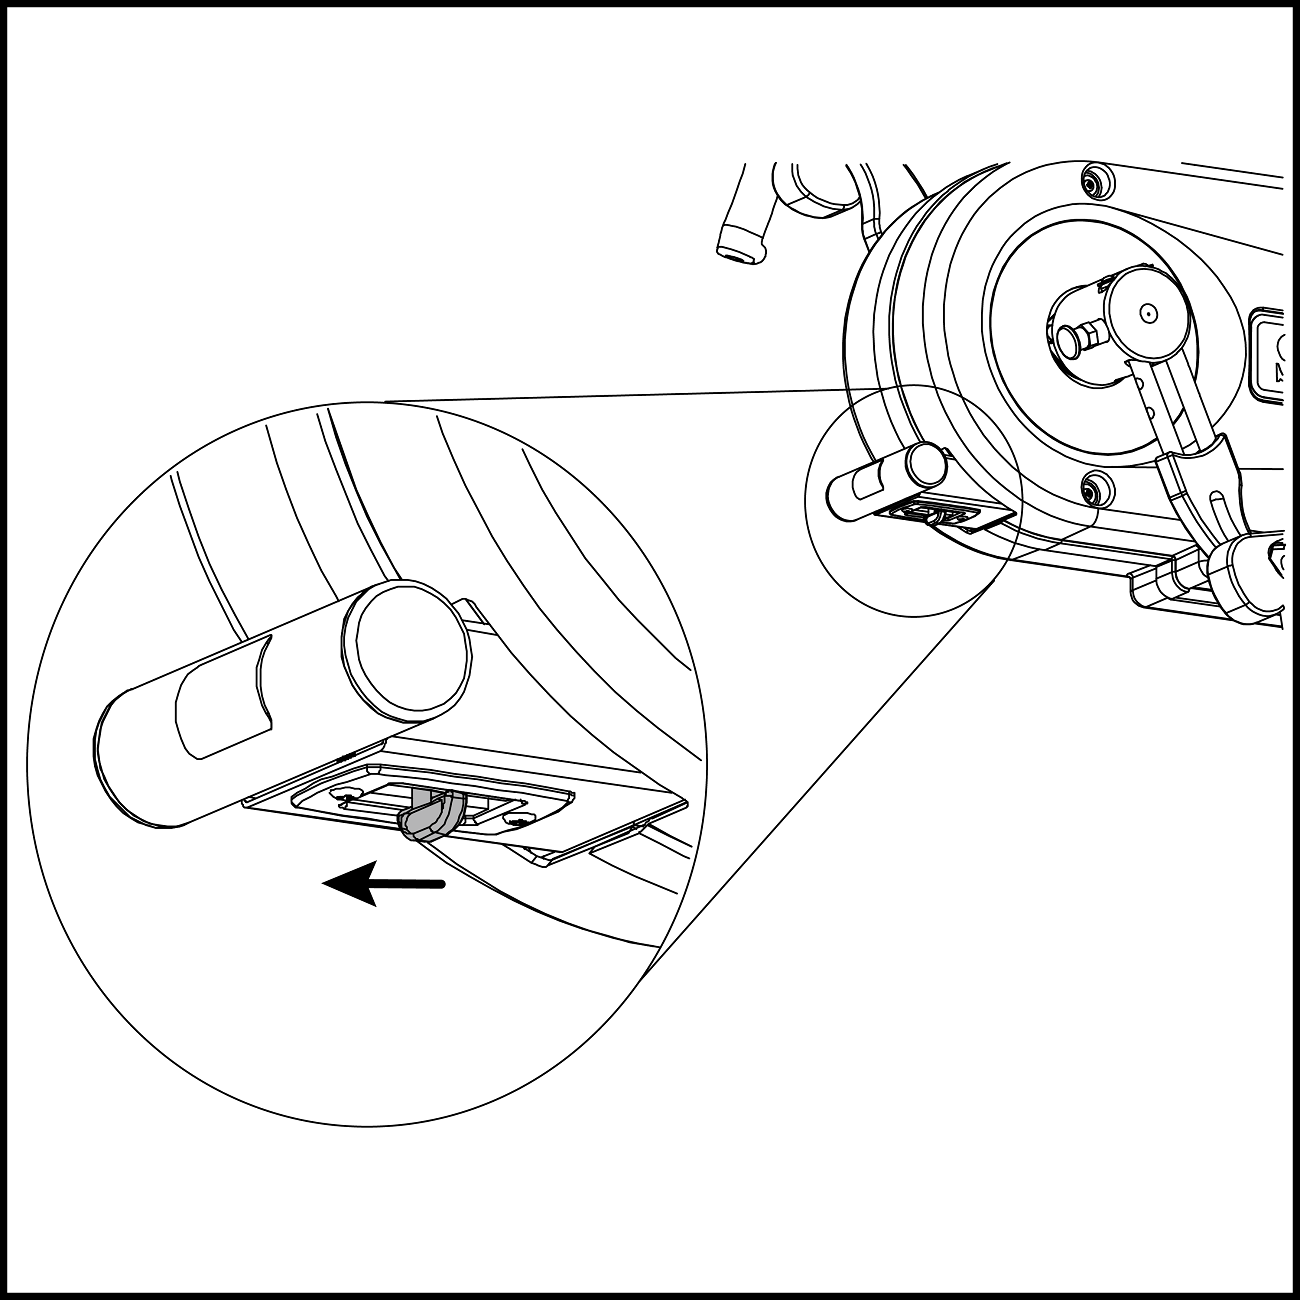
  2. Grab the lift handle at the back of the base frame and lift until the front transport wheels touch the floor, then move the machine to the preferred location.
  3. Once at the location, if needed adjust the left and right end caps to make the machine level with the floor.
  4. Attach both footrests onto the machine's front round tube.
  5. Remount the seat assembly by pressing either the left or right yellow foot levers and hold, then slide the seat assembly onto the base frame and release the foot lever at the preferred position.
    ASSEMBLY AND RELOCATION COMPLETE

4.3: PRO1 Sport Assembly

Short assembly steps will be required when the PRO1 Sport machine arrives. The following will show how to assemble the machine.
Tools Required:
  • Torque wrench set 48 ft-lbs/65 Nm
  • 12"/30.5 cm Ratchet extension
  • Ratchet
  • 5/16"/8 mm Allen hex bit
  • Cordless Drill W/Phillips Bit or Phillips Screw Driver
Parts Required:
  • Washer, Flat 3/8" (Qty. 4)
  • Washer, Split 3/8" (Qty. 4)
  • Screw, 3/8"-16 x 1" Socket (Qty. 4)
  • Screw, M5 x 12mm Phil Black (Qty. 4)
  1. The PRO1 Sport machine will be received as shown and will need to be raised upward. NOTE: The pivot hardware may need to be loosened by using a ratchet, 12" ratchet extension and 5/16" hex bit when raising the main unit and mast.
  2. Note: Once the main unit and mast are raised, any additional packaging may be removed.
    Starting on the right side, use a ratchet extension with a 5/16" hex bit attached and loosely insert a 3/8-16 x 1" socket screw, 3/8" split washer and 3/8" flat washer into the front mast hole nearest the round tube as shown
  3. Repeat step 2 for the left front mast hole.
  4. Starting on the left side, then repeating on the right side use a torque wrench set at 48 ft-lbs/ 65 Nm, 12" ratchet extension and 5/16" hex bit to tighten and secure the mast to the base frame.
  5. Rotate the console mounting bracket upward, then insert the machine communication cable into the RJ45 connector on the back of the console.
  6. Use a phillips screw driver or cordless drill with attached phillips bit to secure the console to the mounting bracket with (Qty. 4) M5 x 12mm Phil Black Zinc screws.
    The machine is now ready to be moved to the customer preferred location.

4.4: PRO1 Sport Relocate

  1. With both hands carefully grab the rear round cross tube of the base frame, then lift until the transport wheels touch the floor and move to the preferred location.
  2. Once at the preferred location adjust the left/right front and rear end caps to make the machine level with the floor if needed.
  3. Note: Platforms will only attach to the base frame in one direction
    Place the left and right platform onto the base frame.
    ASSEMBLY AND RELOCATION COMPLETE.

Chapter 5: Adjustments

5.1: Machine Power Up

Note: Turn the crank handles in either direction or plug the AC wall pack into a wall outlet, then to the machine.

5.2: Low Starting Resistance Information

In facilities where the lowest possible starting resistance is desired, please use the enclosed, UL Approved, 18 volt adapter (#P4861) to plug your SCIFIT product into an electrical outlet.

While all SCIFIT products provide low starting resistance, the use of the 18 volt adapter makes a noticeable difference in lowering the starting resistance.

AC adapter extensions (#P4669) are available to order from our parts department. This adds 6 feet to the existing 6 foot cord on your adapter.

5.3: Console Adjustment

The console may be tilted forward or backward to allow a better view of the console screen during a workout.

5.4: Upper Crank Adjustment

Note: Ensure that the adjustment knob is fully engaged into the hole of the crank rod when adjusting.

9" (23 cm) Radius, 1st hole position
8" (20 cm) Radius, 2nd hole position

7" (18 cm) Radius, 3rd hole position
6" (15 cm) Radius, 4th hole position

5.5: Main Body Adjustment

Note: Pull the angle adjustment lever forward and hold, then move the main body up or down and release at the preferred angle.

5.6: Rowing Motion

Customers may use a feature of the PRO1 called the "Rowing Motion". This will require the right crank and handle to be repositioned in the same direction as the left. The following steps with show how this is done.

TOOLS REQUIRED:

  • 5/32" (4 mm) Allen Hex Wrench
  1. Use the 5/32" allen wrench to remove the screws and washers on the ends of the two right side crank rods, then place them to the side
  2. Firmly grab the right crank, then pull the yellow adjustment knob outward allowing the crank to be removed from the hub.
  3. Turn and position the crank/handle in the same direction as the left with the curved portion of the crank facing the operator, then pull the adjustment knob outward and slide the crank rods into the holes of the hub, releasing the knob into any of the crank rod holes.
  4. Re-secure the screws and washers to the ends of the crank rods using the 5/32" wrench.
  5. Adjust the left and right cranks to the same holes positions according to your preference before starting the workout.

Chapter 6: Biomechanical Positioning

6.1: Machine Entry (PRO1 Seated)

  1. Choose one of the following to position seat for entry.
    • Press and hold the yellow foot lever located on either side of the seat base (see Seat System manual), then move the seat back to allow sufficient entry space and release the foot lever, then sit on the seat assembly.
    • Lift upward on the yellow swivel lever (Premium only) located on either side of the seat (see Seat System manual) and rotate the seat 90 degrees to the right or left to access the bottom seat pad and release, then sit down and again lift upward on the swivel lever and rotate back into the original position.
  2. Position the seat forward or backward to a comfortable location using the yellow foot lever, then release the lever allowing for a slight knee bend when placing your feet on the foot rests and enough distance to reach the cranks handles.
  3. Adjust the height (Premium only) of the seat using the yellow bar on the front of the seat (see Seat System manual) to obtain a comfortable position.

6.2: Machine Entry (PRO1 Sport)

  1. Step onto the molded platforms and face the console.

6.3: Initiating a Workout (PRO1/PRO1 Sport)

  1. Firmly grab the upper hand cranks and begin rotating them continuously to keep the console powered up.
    Note: The AC adapter may also be connected to the machine to keep the console continuously powered-up.
  2. Select the workout program preferred (see Console Program manual) and begin the workout.

6.4: Exit the Machine (PRO1 Seated)

Choose one of the following ways to exit the machine.
  1. Press and hold the yellow foot lever located on either side of the base of the seat base, then move the seat back to allow sufficient exit space and release the foot lever. Carefully lift yourself up and exit the machine.
  2. Lift upward on the yellow swivel lever (Premium only) located on either side of the seat and rotate the seat 90 degrees right or left, then release. Carefully lift yourself upward and exit the machine.

Chapter 7: Specifications

7.1: Specifications

PRO1 Seated

Weight PRO1 Seated: 248 lbs. (112 Kg.)
Max User Weight 450 lbs. (204 Kg) Premium, 500 lbs (227 Kg) Standard, 600 lbs. (272 kg.) Bariatric
Power Self generating w/auto recharge battery back-up. Standard low voltage AC adapter wall pack.
Resistance System Electromagnetic Self Generating Bi-directional Resistance
Programs Manual, Fit Quik, Constant Workout, ISO-Strength, 7 Pre-programmed Hills profiles, Heart Rate, Power Fit, Heart Fit, Stress Test and Random
Accuracy Class Class A
Length 60" (152 cm)
Width 30" (76 cm),
Height 67" (170 cm)

PRO1 Sport

Weight PRO1 Sport 178 lbs. (81 Kg.)
Max User Weight 750 lbs. (340 Kg)
Power Self generating w/auto recharge battery back-up. Standard low voltage AC adapter wall pack.
Resistance System Electromagnetic Self Generating Bi-directional Resistance
Programs Manual, Fit Quik, Constant Workout, ISO-Strength, 7 Pre-programmed Hills profiles, Heart Rate, Power Fit, Heart Fit , Stress Test and Random
Accuracy Class Class A
Length 60" (152 cm)
Width 30" (76 cm),
Height 67" (170 cm)

Chapter 8: Warranty

8.1: What is Covered

This Life Fitness commercial exercise equipment product is warranted to be free of all defects in material and workmanship.

8.2: Who is Covered

The original purchaser or any person receiving the product as a gift from the original purchaser. Warranty will be voided on subsequent transfers.

8.3: How Long it is Covered

All coverage is provided by specific Product according to the guidelines listed in the Warranty Information.

8.4: Who Pays Transportation and Insurance For Service

If the Product or any covered part must be returned to a service facility for repairs, We, Life Fitness , will pay all transportation and insurance charges for the first year. You are responsible for transportation and insurance charge after the first year.

8.5: What We Will Do To Correct Covered Defects

We will ship to you any new or rebuilt replacement part or component, or at our option, replace the Product. Such replacement parts are warranted for the remaining portion of the original warranty period.

8.6: What is Not Covered

Any failures or damage caused by unauthorized service, misuse, accident, negligence, improper assembly or installation, debris resulting from any construction activities in the Product’s environment, rust or corrosion as a result of the Product’s location, alterations or modifications without our written authorization or by failure on your part to use, operate and maintain the Product as set out in your Operation Manual (“Manual”).

One type RJ45 interchangeable Network ready and Fitness Entertainment port is supplied with the Product. This port complies with the FitLinxx CSAFE specification dated August 4, 2004 stating: 4.75 VDC to 10 VDC; maximum current of 85 mA. Any Product damage caused by a load exceeding this FitLinxx CSAFE specification is not covered by warranty.

All terms of this warranty are void if this product is moved beyond the continental borders of the United States of America (excluding Alaska, Hawaii and Canada) and are then subject to the terms provided by that country’s local authorized Life Fitness representative.

8.7: What You Must Do

Register your Product online at http://www.scifit.com/warranty-registration-2/.

Retain proof of purchase; use, operate and maintain the Product as specified in the Manual; notify Customer Support Services of any defect within 10 days after discovery of the defect; if instructed, return any defective part for replacement or, if necessary, the entire Product for repair.

8.8: How to Get Parts and Service

Refer to the Corporate Headquarters section of this manual for your local service contact information. Reference your name, address and the serial number of your Product (consoles and frames may have different serial numbers). They will tell you how to get a replacement part, or, if necessary, arrange for service where your Product is located.

8.9: Exclusive Warranty

THIS LIMITED WARRANTY IS IN LIEU OF ALL OTHER WARRANTIES OF ANY KIND EITHER EXPRESSED OR IMPLIED, INCLUDING BUT NOT LIMITED TO THE IMPLIED WARRANTIES OF MERCHANTABILITY AND FITNESS FOR A PARTICULAR PURPOSE, AND ALL OTHER OBLIGATIONS OR LIABILITIES ON OUR PART. We neither assume nor authorize any person to assure for us any other obligation or liability concerning the sale of this Product. Under no circumstances shall we be liable under this warranty, or otherwise, of any damage to any person or property, including any lost profits or lost savings, for any special, indirect, secondary, incidental or consequential damages of any nature arising out of the use of or inability to use this Product. Some states do not allow the exclusion or limitation of implied warranties or of liability for incidental or consequential damages, so the above limitations or exclusions may not apply to you. Warranty coverages and terms may differ outside the United States. Please contact the Life Fitness office servicing your country (contact information found at the front of this manual) or visit the applicable local Life Fitness website to receive the specific warranty information for your country.

8.10: Changes in Warranty Not Authorized

No one is authorized to change, modify or extend the terms of this limited warranty.

8.11: Effects of State Laws

This warranty gives you specific legal rights, and you may have other rights which vary from state to state and country by country.