*Also check www.lifefitness.com for local representation or distributor/dealer
ii FCC Compliance Information
Changes or modifications to this unit not expressly approved
by the party responsible for compliance could void the user’s authority to operate
the
equipment.
This equipment has been tested and found to comply with the limits for a
Class B digital device, pursuant to part 15 of the FCC Rules. These limits
are designed to provide reasonable protection against harmful interference
in a residential installation. This equipment generates, uses and can
radiate radio frequency energy and, if not installed and used in accordance
with the instructions, may cause harmful interference to radio
communications. However, there is no guarantee that interference will not
occur in a particular installation. If this equipment does cause harmful
interference to radio or television reception, which can be determined by
turning the equipment off and on, the user is encouraged to try to correct
the interference by one or more of the following measures:
Reorient or relocate the receiving antenna.
Increase the separation between the equipment and receiver.
Connect the equipment into an outlet on a circuit different from
that to which the receiver is connected.
Consult the dealer or an experienced radio/TV technician for
help.
Chapter 1: Safety
1.1: Safety Mode
Safety mode is an option on treadmills. When turned on, inactivity after 1 minute,
30 seconds in
any mode will lock the keyboard. To return to the last screen, press
ENTER. When in safety mode, treadmills will be immobilized. The
default is Safety Mode On. Safety Mode can be turned off in the settings menu. See
the Settings section for instructions.
1.2: Safety Instructions
Owner of the equipment is
responsible for providing the users of the equipment
with all warnings and instructions.
Warning: Keep batteries out of reach of children.
Some chest straps may contain a removable battery.
Swallowing may lead to serious injury in as little as 2 hours or death, due to chemical
burns and potential perforation of the esophagus.
If you suspect your child has swallowed a battery, immediately call your local poison
control for fast, expert advice.
Examine devices and make sure the battery compartment is correctly secured, e.g. that
the screw or other mechanical fastener is tightened. Do not use if compartment is
not
secure.
Dispose of used button batteries immediately and safely. Flat batteries can still
be
dangerous.
Tell others about the risk associated with button batteries and how to keep their
children safe.
Warning: Health-related injuries may result from
incorrect or excessive use of exercise equipment. Life Fitness
STRONGLY recommends seeing a physician for a complete medical exam before undertaking
an
exercise program, particularly if the user has a family history of high blood pressure
or
heart disease, is over the age of 45, smokes, has high cholesterol, is obese, or has
not
exercised regularly in the past year. If, at any time while exercising, the user experiences
faintness, dizziness, pain, or shortness of breath, he or she must stop immediately.
Warning: Heart rate monitoring systems may
be inaccurate. Over exercising may result in serious injury or death. If you feel
faint, stop exercising immediately.
Warning: To reduce the risk of burns, fire,
electric shock, or injury, it is imperative to connect each product to a properly
grounded electrical outlet.
Note: Safety of the equipment can
be maintained only if the equipment is examined regularly for damage or wear. Keep
the equipment out of use until defective parts are repaired or replaced.
Life Fitness
does not warrant nor guarantee that component parts used in the
manufacture of products offered under the Life Fitness
brand are latex-free. Users of these products must take all necessary
precautions to prevent accidental contact that could lead to an adverse
latex reaction.
Before using this
product, it is essential to read this ENTIRE
operation manual and ALL instructions. This product
is intended for use solely in the manner described
in this manual.
Always follow the console instructions
for proper operation.
This appliance is not intended
for use by persons (including children) with reduced
physical, sensory, or mental capabilities, or lack
of experience or knowledge unless they have
supervision or been given instruction concerning the
use of the appliance by a person responsible for
their safety.
Do not allow children under 14
years of age unattended access to the
machine.
Never place liquids of any type
directly on the unit, except in an accessory tray or
holder. Containers with lids are
recommended.
Do not use this product
outdoors, near swimming pools or in areas of high
humidity.
Keep all loose clothing,
shoelaces, and towels away from moving
parts.
Place on a stable, flat surface
in a horizontal position during use for maximum
stability.
Use caution when mounting or
dismounting the product. Before mounting, use the moving arms to bring the
foot plate nearest to you to the lowest position. Use the stationary
handlebars whenever additional stability is required. While exercising, hold
onto the moving arms.
Never operate the product if it has a damaged
power cord or electrical plug, or if it has been dropped, damaged, or even
partially immersed in water. Contact Customer Support Services.
Do not use these products in bare feet. Always wear
shoes. Wear shoes with rubber or high-traction soles. Do not use shoes with
heels, leather soles, cleats or spikes. Make sure no stones are embedded in
the soles.
Do not reach into, or underneath,
the unit or tip it on its side during
operation.
Keep all loose clothing,
shoelaces, and towels away from moving
parts.
Use these products for their
intended use as described in this manual. Do not use
attachments that have not been recommended by the
manufacturer.
When the product is not in use, Life Fitness
recommends unplugging the product. Disconnect
from the electrical outlet when not in use, and
before putting on or taking off parts.
Never operate the product with the air openings
blocked. Keep air openings free of lint, hair, or
any other obstructing material.
Never operate the product if it has a damaged
power cord or electrical plug, or if it has been dropped, damaged, or even
partially immersed in water. Contact Customer Support Services.
Allow LCD consoles to
“normalize” with respect to temperature for one hour
before plugging the unit in and using.
In conformity with the European Union
Machinery Directive 2006/42/EC, this equipment unloaded runs at sound
pressure levels below 70 dB (A) at the average operating speed of 8 km/hr.
Noise emission under load is higher than without load.
1.3: Consignes de Sécurité
Warning: Tenir les piles hors de portée des enfants.
Certaines sangles de poitrine peuvent contenir une pile jetable.
L’ingestion de la pile peut provoquer des blessures graves voire la mort en moins
de 2 heures en raison du risque de brûlures chimiques et de perforation de l’œsophage.
Si vous pensez que votre enfant a avalé une pile, contactez immédiatement le centre
anti-poison local pour obtenir des conseils spécifiques.
Contrôlez l'appareil et assurez-vous que le compartiment pour pile est bien fermé,
par exemple que la vis ou toute autre fixation mécanique est bien serrée. Ne pas utiliser
le produit si le compartiment n'est pas bien fermé.
Éliminer les piles bouton immédiatement et de manière sûre. Les piles bouton sont
une source de danger.
Informez les tiers des risques associés aux piles bouton et de la manière dont ils
doivent agir pour protéger leurs enfants.
Warning: Des problèmes de santé peuvent survenir en cas d’une utilisation incorrecte ou excessive
de l'équipement. Life Fitness
Recommande VIVEMENT aux utilisateurs de passer un examen médical complet avant d'entamer
un programme d'entraînement, et tout particulièrement dans les cas suivants : antécédents
familiaux d'hypertension (pression sanguine trop élevée) ou de pathologies cardiaques,
utilisateurs de 45 ans ou plus, tabagisme, hypercholestérolémie (taux de cholestérol
sanguin trop élevé), obésité, absence d'exercice physique depuis un an ou plus. Si,
pendant l'usage de l'appareil, l'utilisateur éprouve un malaise, des vertiges, des
douleurs ou des difficultés à respirer, il doit s'arrêter immédiatement.
Warning: Les systèmes de surveillance de la fréquence cardiaque peuvent être inexacts. Un exercice
trop intensif peut entraîner des blessures graves, voire mortelles. En cas de malaise,
interrompez immédiatement la séance d’entraînement.
Warning: Pour réduire les risques de brûlures, d’incendies, de décharges électriques ou de
blessures, il est essentiel de brancher chaque appareil sur une prise électrique correctement
mise à la terre.
Note: Pour assurer la sécurité du matériel, il convient de l’inspecter régulièrement afin
de déceler tout signe d’usure ou d’endommagement. N’utilisez pas l’appareil avant
d’avoir réparé ou remplacé les pièces défectueuses.
Avant d’utiliser ce produit, il est impératif de lire ce manuel d’utilisation en ENTIER,
ainsi que TOUTES les instructions. Ce produit est conçu pour être utilisé uniquement
de la manière décrite dans ce manuel.
Pour un fonctionnement correct, suivez toujours les instructions de la console.
Cet appareil n’est pas destiné à être utilisé par des personnes ou des enfants présentant
des capacités physiques, sensorielles ou mentales réduites, ou un manque d’expérience
et de connaissances, sauf en cas de supervision ou d’instructions relatives à son
utilisation par une personne responsable de leur sécurité.
Ne laissez pas les enfants de moins de 14 ans accéder sans surveillance à la machine.
Ne placez jamais de liquides d’aucune sorte directement sur l’appareil, sauf si vous
disposez d’un support ou d’un plateau pour accessoires. Nous vous recommandons de
n’utiliser que des récipients pourvus d’un couvercle.
N’utilisez pas ce produit à l’extérieur, près d’une piscine ou dans des endroits très
humides.
Éloignez les vêtements amples, les lacets de chaussure et les serviettes des parties
mobiles de l’appareil.
Avant d’utiliser l’appareil, placez-le sur une surface stable et plane, en position
horizontale.
Montez et descendez avec précaution du produit. Avant de monter, placez le repose-pieds
situé de votre côté en position basse, en vous aidant des bras mobiles. Utilisez les
poignées fixes lorsque vous avez besoin de renforcer votre équilibre. Pendant les
exercices, tenez les bras mobiles.
Ne faites jamais fonctionner le produit dont la fiche ou le cordon d’alimentation
sont altérés ni aucun appareil qui serait tombé, aurait été endommagé ou même partiellement
plongé dans l’eau. Contactez le service à la clientèle.
N’utilisez pas ces produits avec les pieds nus. Portez toujours des chaussures. Portez
des chaussures à semelles en caoutchouc ou antidérapantes. N’utilisez pas de chaussures
à talon, à semelle en cuir, à crampons ou à pointes. Assurez-vous qu’aucun caillou
ne s’est incrusté dans les semelles.
Ne placez pas les mains à l’intérieur ou sous l’appareil. Ne le faites pas basculer
sur le côté durant son fonctionnement.
Éloignez les vêtements amples, les lacets de chaussure et les serviettes des parties
mobiles de l’appareil.
Utilisez cet équipement uniquement aux fins auxquelles il est destiné et de la manière
décrite dans le présent manuel. N’utilisez pas d’accessoires non recommandés par le
fabricant.
Life Fitness
recommande de débrancher le produit quand il n’est pas utilisé. Débranchez-le systématiquement
après son utilisation et avant l’ajout et le retrait de pièces.
N’utilisez jamais le produit avec les ouvertures d’air bloquées. Maintenez les bouches
d’aération exemptes de peluches, de cheveux ou de toute autre obstruction.
Ne faites jamais fonctionner le produit dont la fiche ou le cordon d’alimentation
sont altérés ni aucun appareil qui serait tombé, aurait été endommagé ou même partiellement
plongé dans l’eau. Contactez le service à la clientèle.
Laissez les consoles LCD s’adapter à la température ambiante pendant une heure avant
de brancher l’appareil et de l’utiliser.
Conformément à la directive Machines 2006/42/EC de l’Union européenne, à vide, cet
équipement sans charge fonctionne à des niveaux de pression acoustique inférieurs
à 70 dB(A) à une vitesse de fonctionnement moyenne de 8 km/h.
L’émission de bruit sous charge est plus élevée qu’à vide.
Chapter 2: Overview
2.1: Console
1. Level / Incline %:
There are two types of displays for Treadmills.
Incline: Number is adjustable only by the user.
Difficulty: Number is shown during RANDOM, HILL, EZ INCLINE, and
SPORTS TRAINING modes.
To change the level during a workout, the underscore beneath the top row of workout
feedback needs to be positioned under LEVEL. If the underscore is not
under LEVEL, it can be moved by pressing left or right on the
navigation button. Adjust the level by pressing up or down on the navigation button.
Level values
Level difficulty
Incline (Treadmills)
1
0.8 - 3.8
2
0.8 - 4.5
3
0.8 - 4.5
4
1.5 - 4.5
5
1.5 - 5.3
6
2.3 - 5.3
7
2.3 - 6.0
8
3.0 - 6.0
9
3.0 - 6.8
10
3.8 - 7.5
11
4.5 - 7.5
12
4.5 - 8.3
13
5.3 - 9.0
14
6.0 - 9.8
15
6.8 - 10.5
16
7.5 - 12.0
17
8.3 - 12.8
18
9.0 - 13.5
19
9.8 - 14.3
20
10.5 - 15.0
2. Time:
During a workout, the display will show the time remaining. Time can be changed to
show the
elapsed time in the Settings
Menu.
The time can be changed at any time during the workout by highlighting the time window
with
the underscore pressing left or right on the navigation button, and then modifying
the time
by pressing up or down on the navigation button. The clock icon minute hand will move
in 15
minute increments.
3. Speed (mph/kp/h):
Note: Miles Per Hour (MPH) can be changed to Kilometers Per Hour (KPH) in the Settings Menu.
Treadmills speed range:
0.5 MPH to 12.0 mph with 0.1 MPH increments
4. Setup Steps icon
(1, 2, 3, 4, 5)
5. Message center:
The message center will help you with the settings in a workout, including selecting
a
workout and entering time and level.
The message center will show certain workout feedback like PACE and METS if they are
turned
on in the Settings Menu.
6. Distance:
Note: Miles can be changed to kilometers in the Settings Menu.
The distance formula tries to replicate distance as if the exercise were being conducted
outdoors. The distance formula will not always be consistent with other products.
7. Heart Rate:
The heart rate display calculates your actual heart rate in contractions or beats
per
minute during a workout. You must hold the contact electrodes or wear a heart rate
telemetry
chest strap for the heart rate display to function (see The Polar®
Telemetry Heart Rate Chest Strap section of this document for more information).
Life Fitness recommends wearing the chest strap for the most accurate heart rate reading.
If
you are experiencing problems with your heart rate reading, please see the Troubleshooting - Heart Rate Scanner section of this document for recommendations
on improving the heart rate reading.
8. Target Heart Rate:
Target heart rate is a percentage of your maximum heart rate. The goal is to target
a range
that enables one's heart and lungs to receive the most benefit from a workout. The
console
calculates the target heart rate by taking the maximum heart rate and multiplying
that
number by an intensity level. Maximum heart rate = 206.9 - (.67 × user’s age). Life
Fitness
intensity levels are 65% for weight loss and fat burning and 80% for improving
cardiovascular endurance. The display will toggle between the 65% and 80% intensity
levels.
An arrow pointing up or down will illuminate to show when your actual heart rate is
above or
below the target heart rate.
9. Calories:
The console calculates an average caloric burn based on a Life Fitness proprietary
calorie
equation.
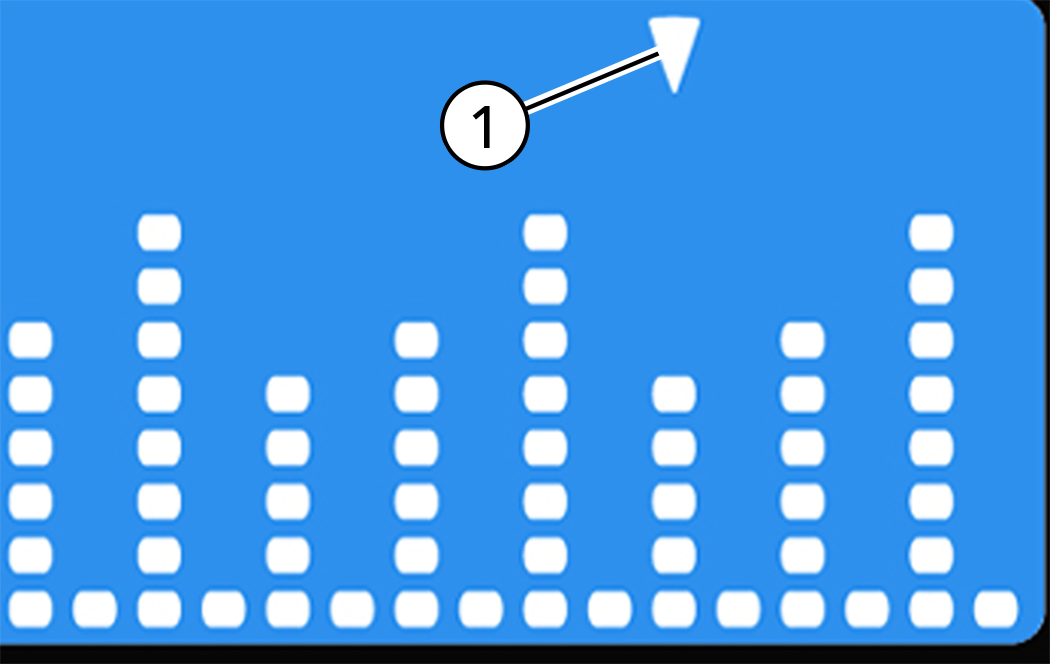
10. Workout profile:
The workout profile graphically displays the intensity of a workout with columns of
various
heights. During the workout, your current intensity level is signified by an arrow
located
above the appropriate column. During a heart rate workout, the workout profile acts
like a
graph of the user’s heart rate. Each of the nine rows of the profile will represent
your
actual heart rate as a percentage of the heart rate maximum. At the end of the workout,
you
will see your heart rate ranges throughout the workout.
Heart Rate Range
Column
Maximum Heart Rate Percentage Range
1
<30%
2
30%-39%
3
40%-49%
4
50%-59%
5
60%-69%
6
70%-79%
7
80%-89%
8
90%-99%
9
100%
Workout Profile Indicator Arrow
The arrow (1) located above the columns in the workout profile shows your position
in the workout. The position is represented by the time entered during workout setup
divided
by the number of columns. During RACE MODE, the arrow splits into two
separate arrows -a filled in arrow and an outline of an arrow, which simulates you
and the
pacer.
Level Meter
Level Range
Incline Range (Treadmills Only)
1-2
0.0-1.0%
3-4
1.1-2.0%
5-6
2.1-3.0%
7-8
3.1-4.0%
9-10
4.1-5.0%
11-12
5.1-6.4%
13-14
6.5-7.5%
15-16
7.6-9.0%
17-18
9.1-10.5%
19-20
10.6-12.0%
The higher the fill of the meter, the more difficult the workout.
2.2: Heart Rate Zone Training®
Note: Consulting a fitness trainer is recommended for defining specific fitness goals and
designing a workout program.
Research shows that maintaining a specific heart rate while exercising is the optimal
way to
monitor the intensity of a workout and to achieve maximum results. That is the idea
behind the
Life Fitness Heart Rate Zone Training® approach to exercise. Zone Training identifies
an
exerciser's ideal heart rate range -or zone- for burning fat or increasing cardiovascular
fitness. The zone is a percentage of the theoretical maximum, and its value depends
on the
workout. The maximal heart rate formula is defined by the American College of Sports
Medicine's "Guidelines for Exercise Testing and Prescription", 8th Edition, 2009.
Heart Rate
maximum equals to 206.9 minus the total of 0.67 multiplied by a person’s age (206.9
- (0.67 ×
age). Reference the chart below for theoretical maximum heart rates and target heart
rates.
This products feature these exclusive workouts designed to take full advantage of
the
benefits of Heart Rate Zone Training® exercise:
FAT BURN
CARDIO
HR HILL
HR INTERVAL
EXTREME HR
These workout programs measure heart rate. Wear the telemetry heart rate chest strap
or grip
the contact heart rate sensors to enable the computer to monitor the heart rate during
a
workout. The computer automatically adjusts the incline or level to maintain the target
heart
rate based on the actual heart rate.
Age
Theoretical Maximum Heart Rate
65% (Moderate Burn)
80% (Vigorous Burn)
10
200
130
160
20
194
126
155
30
187
121
149
40
180
117
144
50
173
113
139
60
167
108
133
70
160
104
128
80
153
100
123
90
147
95
117
99
141
91
112
Wear the optional Polar® telemetry heart rate chest strap, or grip the
Lifepulse™ sensors, to enable the on-board computer to monitor the heart
rate during a workout. The computer automatically adjusts the incline level to maintain
the
target heart rate based on the actual heart rate.
2.2.1: Heart Rate Sensors
Note: The heart rate sensors may be less or more accurate with different
individuals.
When using heart rate sensors, make certain to grasp the sensors
firmly and keep hands steady. If your heart rate seems substantially higher or lower
than
expected, remove your hands from the sensors the until heart rate disappears from
the heart
rate display. Dry your hands, and grasp the sensors again until your heart rate seems
accurate. If this does not work, you may need to slow the machine to get an accurate
reading.
On treadmills, Life Fitness recommends -for safety and accurate heart rate readings-
that you
stand on the siderails when attempting to monitor your heart rate with the sensors.
The console is equipped with a wireless heart rate monitoring
system in which electrodes, pressed against the skin, transfer heart rate signals
from the
user to the console. The electrodes are inside the chest strap (A) that the user wears
during
the workout. The transmitter strap delivers an optimal heart rate reading when the
electrodes
are in direct contact with bare skin. However it functions properly through a thin
layer of
wet clothing. The electrodes are two grooved surfaces on the underside of the strap,
and must
remain wet to accurately transmit the electrical impulses of the heart back to the
receiver.
To use, first moisten the electrodes. Then, secure the strap as high under the
chest muscles as possible. The strap should be snug, but comfortable enough to allow
for
normal breathing. Electrodes must be wet to work properly. If it becomes necessary
to
re-moisten, grasp the center of the strap, pull it away from your chest to expose
the
electrodes, and moisten. See diagram below for correct positioning of the strap.
The transmitter strap delivers an optimal heart rate reading when
the electrodes are in direct contact with bare skin. However, it functions properly
through a
thin layer of wet clothing. If it becomes necessary to re-moisten the Polar telemetry
heart
rate chest strap electrodes, grasp the center of the strap, pull it away from the
chest to
expose the two electrodes, and re-moisten them.
Note: Using the wireless heart rate telemetry chest
strap will provide more accurate heart rate readings than the hand pulse sensors.
Chapter 3: Exercise and Product Information
3.1: Console Operation
SETTINGS:
Press this button once to enter the Settings Menu of the console. In
the Settings Menu, you can set preferences for the console display. See the
Settings section of this document for details and
instructions.
USER PROFILES:
Press this button once to select one of two user profiles. Once
programmed, the system saves workout data for two primary users. Hold this
button for three seconds to enter the User Profiles editing mode. See the User Profiles section of this document for details and
instructions.
PAUSE / RESUME:
Note: When the Energy Saver mode is active, the machine will shut
down after 5 minutes of non-use, regardless of pause status.
Press once
to pause the workout for five minutes, and press again to resume workouts. If
the paused workout is not resumed within five minutes, the console deletes the
workout in progress, and goes into energy saver mode. The pause time can be
modified in the user settings menu. See the Settings section of this document for details and
instructions.
Navigation button:
Navigate the screen by pressing up, down, left, or right on
the button. The button also controls the level, time, and speed (treadmill only)
during workouts. While setting up a workout, press left or right on the
navigation button to scroll through the workout setup options, and then press up
or down on the navigation button to adjust the values. During a workout, press
left or right on the navigation button to scroll between options like level and
time, and then press up or down on the navigation button to adjust those
values.
ENTER / START:
Press the button at any time during initialization to begin a
quick start 30 minute manual workout. During workout setup, this button is used
as a selection key when choosing parameters.
Press this button to select
parameters within workout program.
RESET:
Press this button to clear incorrect data (example: weight or age) when
programming a workout . Pressing RESET two times
immediately stops a workout, and returns to the workout selection
screen.
RACE MODE:
Press this button once during a MANUAL, RANDOM, HILL, EZ
INCLINE, or SPORTS TRAINING workout to turn
on RACE MODE. This mode allows you to race against a
customized, simulated pace. Press this button again while in RACE
MODE to turn it off. See the Race Mode section of this document for details.
GOAL WORKOUTS:
Press this button once to enter the goal workouts selection
screen. There are three goal workouts: CALORIE goal,
TARGET HEART RATE goal, and
DISTANCE goal. These goals function like a manual
workout, where you control the speed and incline/level. The workout ends when
the goal defined during the workout setup is reached.
ENERGY SAVER ON/OFF:
The energy saver mode is used to minimize the power being
used while the equipment is not in use. The unit will automatically go into
energy saver mode five minutes after ending a workout. Press the
ENERGY SAVER button to either “wake up” the console
or put it into the energy saver mode. Energy saver can be turned off in the
settings menu. An indicator LED will flash while in Energy Saver Mode.
3.2: Settings
Press the SETTINGS button at the SELECT
WORKOUT screen. Upon entering the settings menu, the screen will display
SETTINGS MENU.
Press left or right on the navigation button to scroll through the settings options.
Press up or down on the navigation button to adjust the settings.
Press the ENTER button or press left or right on the navigation
button to save modifications and move to the next option.
Press the RESET button to exit the settings menu.
The settings and selection options are listed below.
UNITS
Selection options are English and Metric.
BEEPS
Selection options are On and Off.
WIRELESS HR = ON
This option is for the telemetry heart rate strap. Selection options are On and
Off.
TIMER
Selection options are Up or Down.
METS = OFF
Selection options are On and Off.
PACE = OFF (treadmill)
Selection options are On and Off.
RPM = OFF (bike and cross-trainer only)
Selection options are On and Off.
CONTRAST
Selection options are: 1-99.
Brightness
Selection options are 1-10.
SAFETY MODE (treadmill)
Selection options are On and Off.
Statistics
Press the ENTER button to select. Choose TOTAL
HOURS for the total number of hours that the product was used in a workout,
or choose TOTAL MILES for the number of miles that the product was
used in a workout.
Software version
Press the ENTER button to select. Press up or down on the
navigation button to see the console software version, the console software part number,
and the console software build date.
Floor Model
This option disables the Power Save feature. Selection options are On or Off. The
default is Off (Power Save On).
Belt Lube Timer (treadmill only)
This option tracks the total hours of all workout and cool down time since the last
belt lubrication. When the timer reaches 75 hours, it triggers a reminder message
during
every workout. Press and hold the Down arrow key on the navigation button for five
seconds to reset the timer.
3.3: User Profile
There are two custom workout slots in the Go Console -one for each user profile. Each
profile allows you to create settings and workout information, thereby quickly choosing
a
workout without having to enter workout information. To log into your profile, press
the
USER PROFILE button, navigate to the desired profile, and press
ENTER. If a profile has been created, then the message center will
display LOGGED IN. However, if a profile has not been defined then the
message center will display UNDEFINED.
To create a user profile:
Press the USER PROFILES button.
Press the navigate button, and choose either PROFILE 1 or
PROFILE 2.
Press and hold the USER PROFILES button to enter editing mode.
EDIT PROFILE will display on the message center if successful.
Select an editing option by pressing left or right on the navigation button.
Adjust the editing option by pressing up or down on the navigation button (except
in
CHANGE NAME or CUSTOM WORKOUT.
Press ENTER or press left or right on the navigation button to
save modifications and move to the next option, or press RESET to
select the default value.
After displaying the message EDIT PROFILE, the message center will
display MY PROFILE SETUP. Press ENTER when MY
PROFILE SETUP is displayed to edit the following options:
Change name
Press ENTER, and message center will display
PROFILE with a blinking P. Press up or down on the
navigation button to change the characters. Press left or right on the navigation
button
to move back and forth between characters, and press the RESET
button to erase characters. When finished, press ENTER. If there
is inactivity for more than 10 seconds, then the message center will display
PRESS ENTER TO SAVE.
WEIGHT
Press up or down on the navigation button to change the characters. Press left or
right on the navigation button to move back and forth between characters, and press
the
RESET button to erase characters. When finished, press
ENTER. If there is inactivity for more than 10 seconds, then
the message center will display PRESS ENTER TO SAVE. Selection options
are 75 lbs (34 kg) to the maximum of the product.
AGE
Press up or down on the navigation button to change the characters. Press left or
right on the navigation button to move back and forth between characters, and press
the
RESET button to erase characters. When finished, press
ENTER. If there is inactivity for more than 10 seconds, then
the message center will display PRESS ENTER TO SAVE. Selection options
are 10-99 years.
LEVEL
Press up or down on the navigation button to change the characters. Press left or
right on the navigation button to move back and forth between characters, and press
the
RESET button to erase characters. When finished, press
ENTER. If there is inactivity for more than 10 seconds, then
the message center will display PRESS ENTER TO SAVE. Selection options
are 1-20.
WALK SPEED (treadmills)
Press up or down on the navigation button to change the characters. Press left or
right on the navigation button to move back and forth between characters, and press
the
RESET button to erase characters. When finished, press
ENTER. If there is inactivity for more than 10 seconds, then
the message center will display PRESS ENTER TO SAVE. Selection options
are 0.5-10 mph or 0.8-16 km/hr (F3) and 0.5-12 mph or 0.8-19 km/hr (T3).
JOG SPEED (treadmills)
Press up or down on the navigation button to change the characters. Press left or
right on the navigation button to move back and forth between characters, and press
the
RESET button to erase characters. When finished, press
ENTER. If there is inactivity for more than 10 seconds, then
the message center will display PRESS ENTER TO SAVE. Selection options
are 0.5-10 mph or 0.8-16 km/hr (F3) and 0.5-12 mph or 0.8-19 km/hr (T3).
RUN SPEED (treadmills)
Press up or down on the navigation button to change the characters. Press left or
right on the navigation button to move back and forth between characters, and press
the
RESET button to erase characters. When finished, press
ENTER. If there is inactivity for more than 10 seconds, then
the message center will display PRESS ENTER TO SAVE. Selection options
are 0.5-10 mph or 0.8-16 km/hr (F3) and 0.5-12 mph or 0.8-19 km/hr (T3).
DEFAULT SPEED (treadmills)
Press up or down on the navigation button to change the characters. Press left or
right on the navigation button to move back and forth between characters, and press
the
RESET button to erase characters. When finished, press
ENTER. If there is inactivity for more than 10 seconds, then
the message center will display PRESS ENTER TO SAVE. Selection options
are 0.5-10 mph or 0.8-16 km/hr (F3) and 0.5-12 mph or 0.8-19 km/hr (T3).
LOW INCLINE (treadmills)
Press up or down on the navigation button to change the characters. Press left or
right on the navigation button to move back and forth between characters, and press
the
RESET button to erase characters. When finished, press
ENTER. If there is inactivity for more than 10 seconds, then
the message center will display PRESS ENTER TO SAVE. Selection options
are 0-12% (F3) and 0-15% (T3).
MID INCLINE (treadmills)
Press up or down on the navigation button to change the characters. Press left or
right on the navigation button to move back and forth between characters, and press
the
RESET button to erase characters. When finished, press
ENTER. If there is inactivity for more than 10 seconds, then
the message center will display PRESS ENTER TO SAVE. Selection options
are 0-12% (F3) and 0-15% (T3).
HIGH INCLINE (treadmills)
Press up or down on the navigation button to change the characters. Press left or
right on the navigation button to move back and forth between characters, and press
the
RESET button to erase characters. When finished, press
ENTER. If there is inactivity for more than 10 seconds, then
the message center will display PRESS ENTER TO SAVE. Selection options
are 0-12% (F3) and 0-15% (T3).
DISTANCE GOAL
Press up or down on the navigation button to change the characters. Press left or
right on the navigation button to move back and forth between characters, and press
the
RESET button to erase characters. When finished, press
ENTER. If there is inactivity for more than 10 seconds, then
the message center will display PRESS ENTER TO SAVE. Selection options
are 0.1 – 99.9 miles or 1.6 – 161 km.
TIME GOAL
Press up or down on the navigation button to change the characters. Press left or
right on the navigation button to move back and forth between characters, and press
the
RESET button to erase characters. When finished, press
ENTER. If there is inactivity for more than 10 seconds, then
the message center will display PRESS ENTER TO SAVE. Selection options
are 05:00 to 99:00.
WARM UP TIME
Press up or down on the navigation button to change the characters. Press left or
right on the navigation button to move back and forth between characters, and press
the
RESET button to erase characters. When finished, press
ENTER. If there is inactivity for more than 10 seconds, then
the message center will display PRESS ENTER TO SAVE. Selection options
are 01:00 to 99:00.
COOL DOWN TIME
Press up or down on the navigation button to change the characters. Press left or
right on the navigation button to move back and forth between characters, and press
the
RESET button to erase characters. When finished, press
ENTER. If there is inactivity for more than 10 seconds, then
the message center will display PRESS ENTER TO SAVE. Selection options
are 01:00 to 99:00.
This function can only be used during a MANUAL, RANDOM,
HILL, EZ INCLINE, or SPORTS
TRAINING workouts. Race mode is a function that allows you to race against a
simulated speed that is determined when RACE MODE is pressed. You are
represented by a filled-in arrow above the workout profile and the pacer will be symbolized
by
the outline of the arrow. Race mode can be activated during a workout by pressing
the
RACE MODE button on the console; the race mode symbol will illuminate
if successful. During race mode, the workout profile column will blink to indicate
where you
are in the profile. A prompt will appear in the message display to enter a desired
speed. The
speed you enter will be the pacer’s speed during the race. Speed can be changed using
the
navigation button. Once a race speed is entered, the pacer and your arrows will begin
at the
first column, and race across the workout profile. If the workout time is adjusted
during the
race, the pacer’s settings are reconfigured and the race will start again from the
first
column.
3.5: Workout Selection
The Go Console has 13 specially designed pre-programmed workouts that have been developed
by Life
Fitness. Each workout has a different goal. Read the workout descriptions carefully
so that
you can develop a workout routine that focuses on reaching your specific goals.
The following workout descriptions have the following labeled headers:
Beginner -designed for new users or users starting a new workout routine.
Experienced -designed for users seeking a more challenging workout.
Advanced -designed for athletes who are training for cardiovascular endurance and
special events.
Select Workout Screen
When the SELECT WORKOUT screen appears on the console, press either up or
down or left or right on the navigation button to scroll through the workout choices,
and
select a workout by pressing ENTER. To begin a QUICK
START workout, press ENTER when the SELECT
WORKOUT screen appears. After ENTER is pressed, a
constant-level workout begins. The intensity level does not change automatically.
You must
change it using the navigation button.
Setup Workout screen
Setup workout will appear on the screen depending on how many steps are
needed to setup a workout. The current step the user is on will blink to show where
you are
in the setup process. Throughout the workout setup process, press up or down on the
navigation button to adjust the value that is selected and press left or right on
the
navigation button to scroll back and forth between different steps. In order to advance
to
the next step, either press right or ENTER. After entering the last
step, press ENTER to begin the workout.
3.5.1: Manual
Manual Workout -Beginner
The manual workout is a simple workout that has no predefined intensity levels. The
manual
workout starts at level 1 resistance for bikes and cross-trainers and at 0.5 MPH and
0%
incline for treadmills. You are in control of levels or speed/incline settings.
This workout was designed for users that do not have much experience on the product
and like
to have control of the level and speed/incline settings.
This workout can be started by using the navigation button to scroll to the
MANUAL workout profile and pressing ENTER.
3.5.1.1: Editing a Manual Workout
After setting a workout time, the following will occur if a manual workout is selected.
The message center will display SET SPEED + INCL (for treadmills) or
SET RESISTANCE (bikes and cross-trainers) for approximately three seconds.
Next the message center will display INTERVAL 1. Perform the following steps
after these messages appear on the display.
Select the speed and incline (treadmills) or the resistance (bikes and cross-trainers)
in the appropriate windows, and then press ENTER to move to
INTERVAL 2.
Note: This sequence will continue until all 24 intervals are set.
Repeat Step 1 until the message center displays WORKOUT
SAVED. Use the navigation button to move back and forth between intervals.
When each interval is set and saved, its corresponding visual representation of either
incline or resistance is depicted in the workout profile. By the end of setup, you
will see
your custom workout profile.
3.5.2: Random
Random workout -Experienced
In this workout, the console creates a terrain of different hills and valleys. Over
1 million
different patterns are possible. Random uses resistance or incline adjustments to
create
hills/valleys. Speed is controlled by you.
This workout was designed to provide you with unlimited workout variety. The goal
of this
workout is to prevent workout boredom and improve motivation.
This workout can be started by using the navigation button to scroll to the
RANDOM workout profile and pressing ENTER.
3.5.3: Hill
Hill workout -Experienced
The patented hill workout is an interval training workout. Intervals are periods of
intense aerobic exercise. The workout profile window displays the levels of the intervals,
which together have the appearance of hills and valleys. Resistance (bikes and cross-trainers)
and Incline (treadmills) adjustments are used to simulate the hills/valleys. You control
the
speed.
The hill workout has two main phases in between the warm-up and cool down:
Plateau -slightly increases the intensity and keeps it steady to bring the heart rate
to
the lower end of the target zone.
Interval Training -a series of increasingly steeper hills, alternating with valleys
or
periods of recovery. The heart rate should rise to the higher end of the target zone
during this segment.
The computerized interval training workout has been scientifically demonstrated to
promote
greater cardio-respiratory improvement than steady-pace training. The goal of this
workout is
to improve cardiovascular endurance and break through fitness plateaus.
This workout can be started by using the navigation button to scroll to the
HILL workout profile and pressing ENTER.
3.5.4: EZ Incline
EZ Incline workout -Beginner
EZ incline consists of one hill. You determine the elevation of the peak during the
workout
setup. The peak is reached after 75% of the workout time is completed. Afterward,
the
resistance or incline gradually returns to level 1 or 0% respectively.
In this workout, the gradual changes in elevation are extremely subtle, which lowers
the
perceived exertion. This cardiovascular workout is effective, efficient, and enjoyable
at the
same time. The main goal of the workout is to improve cardiovascular endurance without
the
stress of a rigorous workout.
This workout can be started by using the navigation button to scroll to the EZ
INCLINE workout profile and pressing ENTER.
3.5.5: Sports Training
Sports Training workout -Experienced
Sports training is a workout that simulates being outdoors by using a baseline value
to simulate
a flat surface. The program then simulates moving uphill with values above the baseline
and
downhill with values below the baseline. The adjustments above and below the baseline
are
resistance or incline changes. You control the speed.
The goal of this workout is to simulate outdoor training.
This workout can be started by using the navigation button to scroll to the SPORTS
TRAINING workout profile and pressing ENTER.
3.5.6: Fat Burn
Fat Burn workout -Beginner
You must wear a chest strap for this workout to adequately operate. This program only
uses
resistance or incline adjustments to increase and decrease heart rate. Fat burn maintains
your
heart rate at 65% of your theoretical heart rate maximum. The console continuously
monitors
and displays the heart rate, adjusting the intensity level of the product to reach
and
maintain a target heart rate range. The intensity will not change as long as your
heart rate
is between 60%-72% of the target heart rate.
The goal of the fat burn workout is to efficiently burn fat by eliminating over-training
and
under-training and also maximizing the aerobic benefits of exercise by using the body’s
fat
stores for energy.
This workout can be started by using the navigation button to scroll to the FAT
BURN workout profile and pressing ENTER.
3.5.7: Cardio
Cardio workout -Experienced
You must wear a chest strap for this workout to adequately operate. This program only
uses
resistance or incline adjustments to increase and decrease heart rate. Cardio maintains
your
heart rate at 80% of the theoretical maximum heart rate. The console continuously
monitors and
displays the heart rate, adjusting the intensity level to reach and maintain the target
heart
rate range. The intensity will not change as long as your heart rate is between 72%-85%
of the
target heart rate.
The goal this workout is to place a heavier workload on the heart muscle to emphasize
cardiovascular endurance.
This workout can be started by using the navigation button to scroll to the
CARDIO workout profile and pressing ENTER.
3.5.8: HR Hill
Heart Rate Hill workout -Experienced
You must wear a chest strap for this workout to adequately operate. This program only
uses
resistance or incline adjustments to increase and decrease heart rate. HR hill has
a series of
three hills and three valleys where the duration of the hills and valleys is determined
by
your heart rate. After the warm-up, the intensity of the workout increases until your
heart
rate reaches 70% of the maximum heart rate; this is the first hill. Once you reach
70% of your
maximum heart rate, the program will hold the intensity level for one minute. When
the hill is
completed, the program reduces the intensity and target heart rate goal to 65% of
your maximum
heart rate to simulate a valley or recovery period. Once your heart rate drops to
65% of your
maximum heart rate, the program will keep your heart rate at 65% for one minute. Next,
the
program will increase intensity until your heart reaches 75% of your maximum heart
rate; this
is the second hill, followed by a valley with the target heart rate of 65%. Finally,
the third
hill increases intensity until you reach 80% of your maximum heart rate. Your heart
rate is
held at 80% for one minute, followed by the final valley that decreases your heart
rate to
65%. At the end of the duration of hills and valleys, the workout enters a cool-down
phase. If
you do not reach a heart rate goal after five minutes, the message center displays
a prompt to
increase or decrease speed (for treadmills) or resistance (for bikes and cross-trainers),
depending on whether the workout is in a hill or valley phase. The program does not
proceed to
a new heart rate goal until you reach the current goal.
The design intent of the HR hill workout was to develop a program that adapts to your
fitness
level. As you become more fit, you will encounter additional hills and valleys in
the same
workout duration. This happens because your heart rate will be recovering more quickly
during
valleys.
This workout can be started by using the navigation button to scroll to the HR
HILL workout profile and pressing ENTER.
3.5.9: HR Interval
Heart Rate Interval workout -Experienced
You must wear a chest strap for this workout to adequately operate. This program only
uses
resistance (bikes and cross-trainers) or incline (treadmills) adjustments to increase
and
decrease your heart rate. This program alternates between a hill that brings your
target heart
rate up to 80% of your heart rate maximum , and a valley that brings your target heart
rate
down to 65% of your heart rate maximum. After the warm-up, the intensity of the workout
increases until your heart rate reaches 80% of your heart rate maximum; this is the
first
hill. Once you reach a target heart rate of 80%, the program will hold the intensity
level for
3 minutes. When the hill is completed, the program creates a valley, which reduces
the
intensity until a target heart rate of 65% is reached. This sequence continues for
all three
hills and valleys. At the end of the duration of hills and valleys, the workout enters
a
cool-down phase. If you do not reach a heart rate goal after five minutes, the message
center
displays a prompt to increase or decrease speed (for treadmills) or resistance (for
bikes and
cross-trainers), depending on whether the workout is in a hill or valley phase. The
program
does not proceed to a new heart rate goal until you reach the current goal.
The design intent of the HR Interval workout was to develop a program that adapts
to your
fitness level and is more challenging than the HR hill workout. As you become more fit,
you will encounter additional hills and valleys in the same workout duration. This
is because
your heart rate is recovering more quickly during valleys.
This workout can be started by using the navigation button to scroll to the HR
INTERVAL workout profile and pressing ENTER.
3.5.10: Extreme HR
Extreme Heart Rate workout -Advanced
You must wear a chest strap for this workout to adequately operate. This program uses
only
resistance (for bikes and cross-trainers) or incline adjustments (treadmills) to increase
and
decrease heart rate. This program alternates between two target heart rates of 85%
and 65% of
your heart rate maximum by alternating as quickly as possible. The effect is similar
to
performing sprints. During the workout, once either of the two target heart rates
is reached,
it is held for 20 seconds and then the intensity changes to meet the other target
heart
rate.
The design of this workout is sports specific. This workout challenges you with short
bursts
of resistance. The goal of this workout is to help you break through fitness improvement
plateaus.
This workout can be started by using the navigation button to scroll to the EXTREME
HR workout profile and pressing ENTER.
3.5.11: Custom Workout
There are two custom workout slots in the Go Console -one for each user profile.
To create a custom workout:
Press the USER PROFILES button.
Press the navigate button, and choose either PROFILE 1 or
PROFILE 2.
Press and hold the USER PROFILES button to enter editing
mode.
Scroll to the option CUSTOM WORKOUT.
Press ENTER to edit the workout. Upon pressing
ENTER, the message center will display WORKOUT =
MANUAL.
Press the navigation button, and choose MANUAL or HEART
RATE.
Set a workout time when SELECT WORKOUT TIME appears on the screen.
The workout is constructed into 24 intervals, each lasting the duration of 1/24th
of the
workout time entered. For example, if you set a workout for 24 minutes, each of the
24
intervals will be 1 minute.
After a user has created a custom workout and has logged into one of the two user
profiles,
the CUSTOM WORKOUT option will appear after EXTREME
HR in the workouts list. To select your custom workout, press
ENTER when CUSTOM WORKOUT appears in the
workout choices.
3.5.11.1: Editing a Custom Workout
Reenter the user profile menu, and scroll to the CUSTOM WORKOUT
option to edit a custom workout.
Press and hold the USER PROFILES button to enter editing mode.
Select your custom workout, and press ENTER to view
INTERVAL 1 and its previously defined settings.
Note: This sequence will continue until all 24 intervals are set, and then the message
center will display WORKOUT SAVED.
Use the navigation button to modify the current settings or press
ENTER to move to INTERVAL 2.
3.5.11.2: Editing a Heart Rate Custom Workout
If a heart rate workout is selected, the message center will display SET TARGET
HR for approximately three seconds after setting a workout time. Next, the
message center will display INTERVAL 1.
Enter you desired target heart rate in the appropriate window, and then press
ENTER to move to INTERVAL 2.
Note: This sequence will continue until all 24 intervals are set.
Repeat Step 1 until the message center displays WORKOUT
SAVED. Use the navigation button to move back and forth between
intervals.
When each interval is set and saved, its corresponding visual representation of either
incline or resistance is depicted in the workout profile. By the end of setup, you
will see
your custom workout profile. Use the table below to assist your custom workout.
Note: The percent in the table represents your actual heart rate as a percent of their heart
rate maximum. The heart rate maximum is 206.9 - (.67 x your age). For example, a 40
year
old’s heart rate maximum would be 206.9 -0.67 x 40) = 180. During their workout at
the first
interval their actual heart was 100. Therefore 100/180 = .56 or 56%, and the profile
would
display the user at row 4 for the first interval of the workout.
Row
Target Heart Rate Percent Range
1
<30%
2
30 - 39%
3
40 - 49%
4
50 - 59%
5
60 - 69%
6
70 - 79%
7
80 - 89%
8
90 - 99%
9
100%
Chapter 4: Service and Technical Data
4.1: Lubricating the Walking Belt
Turn the treadmill off with the ON / OFF switch, and then unplug the power cord from
the
outlet.
Loosen the rear roller adjustment bolts approximately 10 full turns. Be sure to note
how many turns you have rotated the screws since this is how many turns you will tighten
them at the end of this procedure.
Using the silicon lubricant approved by Life Fitness, apply one half of the bottle
to
the surface of the deck between the belt and the deck. Try to apply the majority of
the
lubricant to the center of the deck.
Visually make sure the walking belt is centered on the deck, and then tighten the
rear
roller adjustment bolts the same number of turns as when you loosened them.
Plug the treadmill in, and turn on the ON / OFF switch.
Reset the LUBRICATE WALKING BELT message on the console. Please
see Belt Lube Timer in the Settings section of this
document.
4.2: Preventive Maintenance Tips
The following preventive maintenance tips will keep your console operating at peak
performance:
Place the product in a cool, dry place.
Keep the console free of fingerprints and salt build-up caused by sweat.
Use a 100% cotton cloth. Lightly moisten the cloth with water and a mild liquid cleaning
product to clean the exercise equipment. Other fabrics -including paper towels- may
scratch the surface. Do not use ammonia or acid-based cleaners. Use cleaners approved
by
Life Fitness. See the Cleaners section for details.
Long fingernails may damage or scratch the surface of your console; use the pad of
your
finger to press the buttons on the console.
Clean the housing on a regular basis.
4.3: Cleaners
Two preferred cleaners have been approved by Life Fitness reliability experts are
PureGreen24™
and Gym Wipes™. Both cleaners will safely and effectively remove dirt, grime, and
sweat from
equipment. PureGreen24™ and the antibacterial formula of Gym Wipes are both disinfectants
that
are effective against MRSA and H1N1.
PureGreen24™ is available in a convenient spray. Apply the spray to a microfiber cloth,
and
wipe the equipment. Use PureGreen24™ on the equipment for at least two minutes for
general
disinfection purposes and at least 10 minutes for fungus and viral control.
Gym Wipes™ are large, durable, pre-moistened wipes to use on the equipment before
and after
workouts. Use Gym Wipes™ on the equipment for at least two minutes for general disinfection
purposes.
Mild soap and water or a mild non-abrasive household cleaner can also be used to clean
the
display and all exterior surfaces. Use only a soft cotton cloth. Apply the cleaner
to the
cotton cloth before cleaning. Do not use ammonia or acid based cleaners. Do not
use abrasive cleaners. Do not use paper towels. Do not apply cleaners directly
to the equipment surfaces.
Inspect power connection at wall outlet and at machine for proper
contact.
You may be in “Energy Saver Mode”.
Press the “Energy Saver” button to see if the console turns on.
Treadmill striding belt slips off-center.
Floor surface is uneven.
Check levelers and level treadmill. Check striding belt and re-tension as
necessary.
Maximum treadmill speed is reduced.
User is pushing striding belt. This occurs when the runner is running faster than
the striding belt will travel, with the result of the striding belt being pushed with
the runner’s feet.
Instruct users not to push striding belt in either
direction.
User is stalling striding belt. This will occur with heavier users at lower
striding belt speeds. The striding belt will “stall” if the user is traveling slower
than the striding belt speed.
Striding belt/deck malfunctions. The deck laminate is worn through or the
underside of striding belt is glazed over (hard, glossy).
Large drops in line voltage from either the wall or a bad power relay on the
motor controller.
Activate the E-Stop. Unplug the unit from the wall for approximately 10 seconds
to reset the system. If the problem persists, replace the motor controller.
4.4.1: Heart Rate Scanner
Malfunction
Probable Cause
Corrective Action
Heart rate reading is initially detected and functioning normally
but then is lost.
Use of personal electronic devices, such as cell phones and portable MP3 players,
causes external noise interference.
Remove the source of noise or reposition the exercise
equipment.
Equipment is in close proximity to other sources of noise such as audio/video
equipment, fans, two way radios, and high voltage/ high current power lines.
Heart rate readings are abnormally elevated.
Television sets and/or antennas, cell phones, computers, cars, high voltage power
lines, motor driven exercise equipment , and another heart rate transmitter within
3
ft. (0.9 m) generate electromagnetic interference.
Move the product a few inches away from the probable cause, or move the probable
cause a few inches away from the product, until the heart rate readings are
accurate.
Heart rate reading is erratic or absent entirely.
Polar telemetry heart rate chest strap transmitter electrodes are not wet enough
to pick up accurate heart rate readings.
Wash the belt transmitter with mild soap and water.
Polar telemetry heart rate chest strap transmitter is not within 3 ft. (0.9 m) of
the heart rate receiver.
Make sure the chest strap transmitter is within 3 ft. (0.9 m) of the heart rate
receiver.
Polar telemetry heart rate chest strap battery is depleted.
Contact Corporate Headquarters for instructions on how to have the Polar telemetry heart rate chest strap
replaced.
Polar telemetry heart rate chest strap did not lock in with the heart rate
receiver.
Make sure the Polar telemetry heart rate chest strap is properly attached to the
user’s chest and move closer to the heart rate receiver inside the console. Wait up
to 10 seconds for the heart rate to display on the console. The overall range of the
heart rate strap is approximately 3 ft. (0.9 m) after it communicates with the
receiver. The strap must be 1.5 - 2 ft. (0.5 - 0.6 m) away from the receiver in
order to start communicating. When the display shows a heart rate value stay within
3 ft. (0.9 m).
Notes:
Ensure proper adherence of the Polar telemetry heart rate chest strap to user’s
chest.
Ensure proper conductivity between the electrodes and user’s chest.
If needed, use the Polar watch to verify chest strap’s operation.
4.5: How to Get Parts and Service
Refer to the Corporate Headquarters section of this manual for your
local service contact information. Reference your name, address and the serial number
of your
Product (consoles and frames may have different serial numbers). They will tell you
how to get
a replacement part, or, if necessary, arrange for service where your Product is located.
Chapter 5: Specifications
5.1: Specifications
Number of Workouts: 10
User Profiles: 2
Interactive Heart Rate Programming: Yes
Heart Rate Telemetry: Yes
Contact Heart Rate: Yes
Goal Workouts: Yes - 3
Race Mode: Yes
Levels: 20
Message Center: Yes - 16 character
Display Type: Custom-etched LCD
Energy Saver: Yes
Warranty: 3 years
Shipped Dimensions
Go Console Treadmills
Go Console Cross-Trainers / Bikes
Length
18 in. / 45.7 cm.
17.5 in. / 44.5 cm
Width
18 in. / 45.7 cm.
15.5 in. / 39.4 cm.
Height
5 in. / 12.7 cm.
4.5 in. / 11.43 cm
Weight
6 lbs. / 2.72 kg.
5 lbs. / 2.27 kg.
Chapter 6: Warranty
Model
3 Year
1 Year
Go Console
Electrical & Mechanical Parts Note: Excludes 3V batteries
Labor
6.1: What is Covered
This
GO Console
is warranted to be free of all defects
in material and workmanship.
6.2: Who is Covered
The original purchaser or any person receiving the product as a
gift from the original purchaser. Warranty will be voided on subsequent transfers.
6.3: How Long is it Covered
Residential: All electrical and mechanical components and labor are covered, after
the date of
purchase, as listed on the chart in this document.
Non-Residential: Warranty void (this product is intended for residential use only).
6.4: Who Pays Shipping and Insurance for Service
If the Product or any warranted part must be returned to a service
facility for repairs, Life Fitness will pay all shipping and insurance charges during
the
warranty period (within the United States only). The purchaser is responsible for
shipping and
insurance charges after the warranty has expired.
6.5: What We Will Do To Correct Covered Defects
We will ship to you any new or rebuilt replacement part or
component, or at our option, replace the Product. Such replacement parts are warranted
for the
remaining portion of the original warranty period.
6.6: What is Not Covered
Any failures or damage caused by unauthorized service, misuse,
accident, negligence, improper assembly or installation, debris resulting from any
construction activities in the Product’s environment, rust or corrosion as a result
of the
Product’s location, alterations or modifications without our written authorization,
or by
failure on your part to use, operate and maintain the Product as set out in your Operation
Manual.
All terms of this warranty are void if this product is moved beyond the continental
borders of the United States of America (excluding Alaska, Hawaii and Canada) and
are then
subject to the terms provided by that country’s local authorized Life Fitness
representative.
6.7: What You Must Do
Retain proof of purchase; use, operate and maintain the Product as specified in the
Manual; notify Customer Support Services of any defect within 10 days after discovery
of the defect; if instructed, return any defective part for replacement or, if necessary,
the entire Product for repair.
OPERATION MANUAL: It is VERY IMPORTANT THAT YOU READ THE MANUAL before operating the
Product. Remember to perform the periodic maintenance requirements specified in the
Manual to assure proper operation and your continued satisfaction.
6.8: Product Registration
Register online at https://lifefitness.com/home/support/product-registration. Our
receipt assures that your name, address and date of purchase are on file as a registered
owner
of the Product. Being a registered owner assures coverage in the event you lose your
proof of
purchase. Please retain your proof of purchase, such as your bill of sale or receipt.
6.9: How to Get Parts and Service
Refer to the Corporate Headquarters section of this manual for your
local service contact information. Reference your name, address and the serial number
of your
Product (consoles and frames may have different serial numbers). They will tell you
how to get
a replacement part, or, if necessary, arrange for service where your Product is located.
6.10: Exclusive Warranty
THIS LIMITED WARRANTY IS IN LIEU OF ALL OTHER WARRANTIES OF ANY KIND EITHER EXPRESSED
OR
IMPLIED, INCLUDING BUT NOT LIMITED TO THE IMPLIED WARRANTIES OF MERCHANTABILITY AND
FITNESS
FOR A PARTICULAR PURPOSE, AND ALL OTHER OBLIGATIONS OR LIABILITIES ON OUR PART. We
neither
assume nor authorize any person to assure for us any other obligation or liability
concerning
the sale of this Product. Under no circumstances shall we be liable under this warranty,
or
otherwise, of any damage to any person or property, including any lost profits or
lost
savings, for any special, indirect, secondary, incidental or consequential damages
of any
nature arising out of the use of or inability to use this Product. Some states do
not allow
the exclusion or limitation of implied warranties or of liability for incidental or
consequential damages, so the above limitations or exclusions may not apply to
you. Warranty coverages and terms may differ outside the United
States. Please contact the Life Fitness office servicing your country (contact information
found at the front of this manual) or visit the applicable local Life Fitness website
to
receive the specific warranty information for your country.
6.11: Changes in Warranty Not Authorized
No one is authorized to change, modify or extend the terms of this
limited warranty.
6.12: Effects of State Laws
This warranty gives you specific legal rights, and you may have other rights which
vary from
state to state and country by country.