Life Fitness

15” ATTACHABLE TV (PRO:IDIOM / IPTV)

Owner's Manual

ATV15-XXXE-01

1023071-0001 AA

Cover Image

i Corporate Headquarters

  • Columbia Centre III, 9525 Bryn Mawr Avenue, Rosemont, IL 60018 • U.S.A.
  • 847.288.3300 • FAX: 847.288.3703
  • Service phone number: 800.351.3737 (toll-free within U.S.A., Canada)
  • Global Website: www.lifefitness.com
International Offices

AMERICAS

North America

Life Fitness, LLC

EUROPE, MIDDLE EAST, and AFRICA (EMEA)

Belgium, Netherlands, and Luxemburg

Life Fitness (Atlantic) B.V.

All Other EMEA Countries and Distributor Business EMEA*

Life Fitness (Atlantic) B.V.

Brazil

Life Fitness Brasil

United Kingdom

Life Fitness UK LTD

ASIA PACIFIC (AP)

Japan

Life Fitness Japan, Ltd

Latin America and Caribbean*

Life Fitness, LLC

Germany, Austria, and Switzerland

Life Fitness Europe GMBH

Hong Kong

Life Fitness Asia Pacific LTD


Spain

Life Fitness IBERIA

All Other Asia Pacific countries and distributor business Asia Pacific*

Life Fitness Asia Pacific LTD

*Also check www.lifefitness.com for local representation or distributor/dealer

Chapter 1: Getting Started

1.1: Safety Instructions

Owner of the equipment is responsible for providing the users of the equipment with all warnings and instructions.

Note:
Warning: To reduce the risk of burns, fire, electric shock, or injury, it is imperative to connect each product to a properly grounded electrical outlet.
Warning: To prevent injury, this product must be securely attached in accordance with the installation instructions.
Danger: To reduce the risk of electrical shock or injury from moving parts, always unplug product before cleaning or attempting any maintenance activity.
  • Life Fitness does not warrant nor guarantee that component parts used in the manufacture of products offered under the Life Fitness brand are latex-free. Users of these products must take all necessary precautions to prevent accidental contact that could lead to an adverse latex reaction.
  • Never operate the product if it has a damaged power cord or electrical plug, or if it has been dropped, damaged, or even partially immersed in water. Contact Customer Support Services.
  • Position the product so that the power cord plug to the wall is accessible to the user. Make sure that the power cord is not knotted or twisted and that it is not trapped under any equipment or other objects.
  • Keep the power cord away from heated surfaces. Do not pull the equipment by the power cord or use the cord as a handle.
  • If the electrical supply cord is damaged, it must be replaced by the manufacturer, an authorized service agent, or a similarly qualified person to avoid a hazard.
  • Always follow the product instructions for proper operation.
  • Never insert objects into any opening in these products. If an object should drop inside, turn off the power, unplug the power cord from the outlet, and carefully retrieve it. If the item cannot be reached, contact Customer Support Services.
  • Do not use this product outdoors, near swimming pools or in areas of high humidity. Do not expose this product to dripping or splashing liquids. If the product should be exposed to liquid, contact Customer Support Services.
  • Never operate the product with the air openings blocked. Keep air openings free of lint, hair, or any other obstructing material.
  • Use these products for their intended use as described in this manual. Do not use attachments that have not been recommended by the manufacturer.

Save these instructions for future reference.

1.2: Radio Frequency Interference

Note: This equipment has been tested and found to comply with the limits for a Class B digital device, pursuant to part 15 of the FCC rules. These limits are designed to provide reasonable protection against harmful interference in a residential installation. This equipment generates, uses and can radiate radio frequency energy, and if not installed and used in accordance with the user manual, may cause harmful interference to radio communications. However, there is no guarantee that the interference will not occur in a particular installation. If this equipment does cause harmful interference to radio or television reception, which can be determined by turning the equipment off and on, the user is encouraged to try to correct the interference by one or more of the following measures:
  • Reorient or relocate the receiving antenna.
  • Increase the separation between the equipment and the receiver.
  • Connect the equipment into an outlet on a circuit different from that to which the receiver is connected.
  • Consult Life Fitness, the dealer or an experienced radio/TV technician for help.
Caution: Any changes or modifications not expressly approved by the party responsible for compliance could void the user's authority to operate the equipment.
Caution: tout changement ou toute modification de ce matériel peut annuler la garantie du produit.

Industry Canada

This Class B digital apparatus complies with Canadian ICES-003.

Cet appareil numerique de la classe B est conforme a la norme NMB-003 du Canada.

1.3: Specifications

15.6” Diagonal Wide Screen Format

Aspect Ratio: 16:9
Viewing Angle: 160 degrees horizontal x 160 degrees vertical
HD Channel Ready: High-definition television will accept content up to 1080p
Visible Screen Size: 13.5" L x 7.6" H (34.4 cm L x 19.4 cm H)
Brightness: 250 nits (cd/m2)
Display Color: 6-bit; 262,144 colors
Resolution: 1.764 million pixels, 1920 (H) x 1080 (V) FHD
Contrast Ratio: 700:1
Video: High-Definition, IPTV through RJ-45
Audio: Mono, Stereo and SAP
IPTV Input: RJ-45 style via CAT-6 wired Ethernet
IPv4 Addressing: Static IP assignment only
IPv4 Multicast IP Support: Yes
IGMP Support: Yes
VLAN Support: Yes
IPTV Streaming Protocols: UDP and RTP
IP Multicast Range: 224.0.0.0 – 239.255.255.255
Port Assignment: 0001-9999
Transport Stream Support: SPTS and MPTS up to 20Mbps
Video Codec Support: MPEG-2, MPEG-4, H.264, HEVC
Audio Codec Support: MPEG Layer 1/2, Dolby, AAC
Pro:Idiom Decryption Support: Yes
Pro:Idiom Detection Type: Automatic
Power Requirements: 15W Nominal
External Power Supply: 12Vdc 1.25A
Power Rating: DC Supply Input: 12Vdc 1.25A
Headphone Jack: 3.5mm Stereo, 300 milliwatt
LCD Screen Length: 13.5" (34.4 cm)
LCD Screen Height: 7.6" (19.4 cm)
VESA Mounting Support: 75mm(H) x 75mm(W), 100mm (H) x 100mm (W)
  Physical Dimensions Shipped Dimensions
Length 16 in. / 40.2 cm 21 in. / 53.3 cm
Depth 2.68 in. / 6.7 cm 7 in. / 17.8 cm
Height 11.6 in. / 29.5 cm 15 in. / 38.1 cm
Weight 8.2 lbs. / 3.72 kg 11.24 lbs. / 5.1 kg

Manufactured under license from Dolby Laboratories. Dolby and the double-D symbol are trademarks of Dolby Laboratories.

1.4: Media Connections

Item Connection Description Connector Type
1 Power In 12 Volt Power Input Power Jack
2 TV Input (RJ45) 10 / 100 / 1000 Ethernet interface RJ-45 Style
3 High-Def Input 1 High-Definition Audiovisual Connection High-Definition
4 High-Def Input 2 High-Definition Audiovisual Connection High-Definition
5 USB USB Input USB Type A
6 Audio Out Headphone Connection 3.5mm Stereo Jack, 0.3W
7 Wired Remote / Media Cable Wired Remote Control Connection Remote Control

1.5: Prerequisite Requirements

Facility will need to provide:

  • Access to their IPTV network through a CAT-5e/CAT-6 wired connection for each and every Pro:Idiom IPTV Attachable TV. Do not support Pro:Idiom over a Wireless LAN connection.
  • Static IP address (IPv4 – 32-bit) assignment for each and every Pro:Idiom IPTV Attachable TV.
  • VLAN (virtual LAN) ID tag assignment if one is required.
  • Channel list information including the streaming protocol used (UDP is the most common), the IP address for each channel, the port assignment, and the channel name associated with each channel.

Limitations

  • The Pro:Idiom IPTV DTB does not support dynamic IP address assignment.
  • Pro:Idiom encrypted IPTV over Wireless Connectivity or WLAN is not supported.

Static IPv4 Address List

  • Each piece of cardio equipment will need to be assigned a static IPv4 address.
  • A range or individual IP addresses for each connected piece of equipment should be provided.

    Example range for five pieces of cardio equipment:

    10.201.34.5 TO 10.201.34.9

1.6: Installation Setup

The initial setup of a fitness facility with the Pro:Idiom IPTV Attachable TV requires obtaining vital setup information including:

  • Static IP address assignment for each Pro:Idiom IPTV Attachable TV
  • The IPTV channel list from the A/V integrator or facility manager for integration into the TV directly.

    Without this information, this TV cannot be setup.

Setup Materials:

  • IR TV Remote
  • USB Flash Drive

1.6.1: Quick Reference Setup Instructions

  1. Enter the Static IP Address for the TV (unique for every TV within the same facility).
  2. Setup VLAN (if one is required, otherwise skip).
  3. Enter each IP Address + Port once, which includes the channel(s).*
    Note: * For MPTS setups, the possible multiple underlying channels will be made visible after the Auto Channel Scan.
  4. Execute an Auto Channel Scan to find all channels within each IP Address.
  5. Verify and edit any other setting in the TV, when needed.
  6. Optional: Export channels & settings to USB memory stick through the Clone feature.
  7. Optional: Import channels & settings through USB memory stick, through the Clone feature to all other TV’s in the same facility.
    Note: Steps 2-5 are the same for every TV withing the same facility (use Clone feature).
    Note: Assumption is that Attachable TV has the latest available software version installed.

1.6.2: Setup Instructions

Follow the Setup Wizard prompts using Go To Next Step to set up Language Time Network Settings including Static IP address entry and VLAN assignment. The Setup Wizard will appear only on the First Time Setup. See Initial Setup: Setup Wizard.

1.6.2.1: Device Static IP Address

  1. If the Setup Wizard is exited, press Menu on the IR TV remote.
  2. Press or to navigate to Setup.
  3. Press or to navigate to Network Settings. Press Enter.
  4. Enter the Static IP address under Device IP section. Each of the four boxes (the first is in green) needs to be filled out using the numeric keypad and right and left arrows for navigation. In the example below, the static IP address for this unit is 192.168.0.100.

1.6.2.2: VLAN ID Setup

After the Static IP address is entered, you can enable VLAN (Virtual Local Area Network) to add in a VLAN ID or VLAN tag assignment. The VLAN ID is to be provided by the facility manager or A/V integrator. This feature is not required but assists with directing traffic that contains both Internet and IPTV together.

Note: If a VLAN ID is NOT required, skip the VLAN ID setup section.

  1. Use the navigation arrows and enable VLAN to ON.
  2. Navigate to Selected VLAN ID. Press Enter or to access the VLAD ID Input table.
  3. Enter in the Port VLAN ID (or PVID for short) which is a default VLAN ID that is assigned to designate the VLAN segment to which this port is connected. Any additional VLANs that are needed to access the IPTV traffic can be placed in the adjacent boxes starting left to right. Any changes will be saved after exiting.

1.6.2.3: IPTV Channel List

This section covers how to create and build the initial IPTV channel list.

Channel List Provided (Example)
Number IP Address Port Channel Number Channel Name
1 239.10.10.23 1234 1-1 AMC
2 239.10.10.24 1234 1-2 FX
3 239.10.10.25 1234 2-1 SYFY
4 239.10.10.26 1234 3-1 TRV
5 239.10.10.27 1234 4-1 WEATH
6 239.10.10.28 1234 5-1 HIST
7 239.10.10.29 1234 6-1 TNT
8 239.10.10.30 1234 7-1 WTTW
9 239.10.10.31 1234 8-1 ESPN
10 239.10.10.31 1234 8-2 WFLD
11 239.10.10.31 1234 8-3 CNN
12 239.10.10.31 1234 8-4 ABC
13 239.10.10.31 1234 8-5 NBC
14 239.10.10.31 1234 8-6 WGN
15 239.10.10.31 1234 8-7 CBS

There are two Channel Setup / Creation Options:

1.6.2.4: Channel Setup Option 1: Channel List Load Feature

The channel list load feature is a method to create a channel list on a PC within an importable text file. This text file can allow the input of a Static IP address, VLAN parameters, and all channel setup parameters including IP address, Port assignment, channel number, and channel name.

  1. Using a PC, open the IP_List.txt file.
  2. Enter specific parameters required for the setup of the channel list. If you do not want to enter a parameter, you can delete the parameter, leave it blank, or comment it out with the addition of a “//” in front (left) of the specific parameter.
    1. Static IP address – One static IP address is required per tuner board and needs to be different within each tuner board. Tuner recognizes Local_IP: field for entry.
    2. VLAN: ON/OFF – Enable or disable VLAN support. Optional feature.
    3. PVID: Port VLAN ID – Only required to be filled in when VLAN is enabled.
    4. Channel Remap – Option to change the order of the channel list using virtual or physical channel numbers.
    5. Channel IP address – Enter the channel IP address for the desired channel or multiple channels.
    6. Channel Port Number – Enter the port number tied to the desired channel IP address.
    7. Channel Name – Enter the Channel Name here.
    8. Virtual Number – Enter the Virtual Channel Number here.
    9. Repeat e. through h. for all channels.
    10. End – Required at the end of the text file.
  3. Once the channel list is built within the IP_List.txt file, store the file onto the root of a USB type-A flash drive.
  4. Insert the flash drive directly into the tuner port shown below.
  5. Navigate the TV menu to Channels. Navigate to TV Channel List - Load from USB (IP_list.txt).
  6. Please Wait will appear and the load of the channel list will take place.
  7. After the load is complete, exit the TV menu. Use the Channel Plus / Minus ( + / - ) buttons on the IR TV remote and navigate to each channel.
  8. The first time the channel is navigated to, the transport stream data will be parsed. This is important and required so the channel loads properly within the TV. This channel setup process will take up to 20 seconds for each channel as you transition between the newly acquired channels. Ensure that each channel is being correctly tuned to and set up with the desired channel parameters. If any changes are required, you can manually edit the channel list using the Channel IP Address List & Edit feature under Channels or edit the IP_list.txt file and re-load the channel list.
Note: Please see the following KB article Life Fitness Attachable TV Pro:Idiom Ethernet Tuner PC Channel List Load for more details.

Quick Fixes

  • If certain channels are not loading, double check that you have the correct channel IP address for these missing channels. If you have the correct channel IP addresses and the channels are still not loading, use the TV Channel Auto Scan feature under Channels and see if this will load the channel list for you. If problems persist, consult with facility manager, IT personnel, or A/V integrator for additional assistance.
  • If none of the channels are loading, double check the tuner_IP static IP address is correctly set and a part of the facilities IPTV network. If problems persist, consult with facility manager, IT personnel, or A/V integrator for additional assistance.

1.6.2.5: Channel Setup 2: Manual Channel List Setup

  1. Navigate the TV menu to navigate to Channels.
  2. Press or to navigate to Channel IP Address Input. Press Enter or .
    Note: The IPTV Channel List needs to be provided by the facility manager, IT personnel, or the A/V integrator. The information needed for each channel is the IP address, the port assignment, channel name, and channel number. If the channel number cannot be provided, a logical channel number sequence will be used as they appear in the list.
  3. Input the first channel's IP address and port number using or to navigate to each cell. Press Enter to save channel. Repeat for every channel within the channel list.
  4. After all the desired channels are entered, select Menu Channels TV Channel Auto Scan .
  5. A prompt to confirm you selection will appear. Press or to select No or Yes.

    After the scan, all channels with the correct address and port assignment parameters will play back content.

  6. Verify that all channels within the channel list are tuned and are displaying content as expected. Any issues can be resolved using the Channel IP Address List & Edit function.
  7. Repeat the TV Channel Auto Scan as necessary.

1.6.2.6: Channel Cloning

After the channel list has been created and verified, use the Clone feature and a USB flash drive to Export / Import the TV settings to other TVs within the facility.

  1. Insert a blank USB flash drive into the port on the initial TV with the created channel list.
  2. Using the IR TV remote, navigate to the Setup menu and down to Clone.
  3. Select Export TV Channels & TV Settings.
  4. Remove the USB flash drive and insert it into the desired TV where the cloned channel list will be imported.
  5. Using the IR TV remote, navigate to the Setup menu and down to Clone. Select Import TV Channels & TV Settings (TVClone.dat).
  6. Repeat the Import process for all TVs within the facility.

Chapter 2: Quick Reference

2.1: Console TV Controls

Integrity SL TV Controls
Item Description
1 TV Power
2 Channel Up / Down Arrows
3 Closed Caption
4 Adjust Volume

2.2: TV Front Panel

The Blue LED indicator is located on front of the attachable TV under the HDTV wording.

Blue LED Status TV Status
On On
Off Off
Blinking Sleep Mode
Blinking Software Update

2.3: TV Menu Access

CYBEX recommends programming the 15” Attachable TV by using an IR TV Remote.

The TV can also be programmed through Integrity SL console. Please follow the guidelines below to program the TV.

Note: The password key on the attachable TVs is always 0000.

If you are unable to follow the guidelines above, do not have an IR TV REMOTE, or if there are any other issues with the 15” Attachable TV please promptly report the issue to Customer Support Services.

Action IR (Infrared) TV Remote
Access Setup Menu Press MENU.

Enter password: 0000.

Scroll Menu Use the UP and DOWN arrow keys.
Make a Selection Press ENTER.
Go Back Press MENU.
Exit Setup Menu Press MENU or Press EXIT.

2.4: IR TV Remote

Programming is easier with the optional IR TV Remote. Contact Cybex to order one or more IR TV Remote controls if desired.

Item Description  
1 Power

Press to turn TV ON / OFF.

2 Mute

Press to mute the sound.

Press again to unmute (or press VOL+).

3 Numeric Keypad

Press 0 - 9 to input a TV Channel directly.

4

Press to enter a specific channel number for multiple program channels (ex. 2-1).

Return to previous channel viewed.

5

Volume Press to increase or decrease sound level.

Channel Press to scan through channels. To scan quickly press and hold down either buttons.

Audio Press to view audio languages.

Auto Press to do auto configuration directly.

Display Press to display the source and channel information.

6

allow navigation of the On Screen Display (OSD) menus and adjustment of settings to your preference.

Enter Press to enter sub menus and make selections.

7 Exit

Press to exit out of OSD menu.

8 Menu

Press to display OSD menus:

  • Picture
  • Sound
  • Time
  • Setup
  • Lock
    • Hotel
  • Channels
Item Description  
9

Input Press to cycle through the available input sources (TV, AV, S-Video, PC, HDMI).

PMODE Press repeatedly to cycle through available picture modes (Dynamic, Standard, Mild, Personal).

SMODE Press to cycle through available sound settings (Standard, Music, Movie, Sports, Personal).

Sleep Select the amount of time in minutes before your TV automatically turns off.

10

Subtitle Turn ON / OFF subtitles.

FAV Press to view Favorite Channel List.

FAV + Press to add a channel to Favorite List.

FAV - Press to delete a channel from Favorite List.

11

Text Turn ON / OFF teletext mode.

Hold (only available in teletext mode). Remain on current page.

TV / Radio Press to select TV or Radio mode.

EPG Press to view the Electronic Program Guide.

Index (only available in teletext mode). Go to first page.

Size (only available in teletext mode). Zoom in / out.

Reveal (only available in teletext mode). Hide or reveal concealed contents on current page.

Subpage (only available in teletext mode). Enter / exit subpage.

12

Color Buttons Use as shortcuts to edit channel settings.

2.4.1: Install Batteries

Two 1.5V-AAA batteries are included and necessary for operation.
  1. Open the battery compartment cover on the back side.
  2. Insert two 1.5 V AAA size batteries in correct polarity.
    Important: Do not mix old or used batteries with old ones.
  3. Close the cover
    Open Cover Install Batteries Close Cover

Point the remote towards the remote control sensor of the wireless TV and use it within 23' (7 m).

Note: Put the used batteries into the recycle bin since it can negatively affect the environment.

Chapter 3: Operation

3.1: Main On Screen Display (OSD)

Menu Navigation

Use the IR TV Remote to access and navigate through the Main On Screen Display (OSD) and TV menus.

  1. Press Menu to display the OSD.
  2. Use the Left and Right Arrow Keys to select desired menu (Picture, Sound, Time, Setup, Lock, or Channels).
  3. Press Enter or Right Arrow Key to enter sub-menus. See Menus.
  4. Use the Up and Down Arrow Keys to select the sub-menu option.
  5. Use the Left and Right Arrow Keys to adjust values in the sub-menu options.
  6. Press Menu to return to the upper menu.
  7. Press Exit to close the OSD.

3.2: Menus

Main Menus Sub-Menus
Initial Setup: Setup Wizard
  • Menu Language
  • Select Time
  • Network Settings
  • Input Channel IP Address
Picture
  • Picture Mode
  • Color Temperature
  • Advanced Settings
Sound
  • Sound Mode
  • Balance
  • Audio Language
  • Surround Sound
  • AVL
Time
  • Sleep Timer
  • Time Zone
  • Daylight Savings Time
  • Time Format
  • Auto Clock
Setup
  • Menu Language
  • OSD
  • Closed Captioning
  • Network Settings
  • Software Update (USB)
  • SW Information
  • Clone
  • Console Auto On / Off
  • Other Settings
Lock
  • Change Password
  • System Lock
  • Hotel Menu
Channels
  • Channel IP Address Input
  • Channel IP Address List & Edit
  • TV Channel Auto Scan
  • TV Channel Remap Selection
  • TV Channel Edit
  • TV Channel Number
  • TV Channel List – Load from USB (IP_list.txt)

3.3: Initial Setup: Setup Wizard

Initial setup steps required to connect to a configured IPTV network.

MENU NAVIGATION
  • Use the Up and Down Arrow Keys to select desired menu item.
  • Use the Left and Right Arrow Keys to move through menu item options.
  • Press Enter or use the Right Arrow Key to select desired menu item option.
  • Press Menu to exit / return to previous screen.
MENU LANGUAGE
Select Preferred Language

English / French / Spanish

TIME
  • Select Time Zone

    Central / Mountain / Pacific / Alaska / Hawaii / Samoa / Newfoundland / Atlantic / Eastern

  • Choose Daylight Savings

    On / Off

  • Select Time Format

    12 hour / 24 hour

NETWORK SETTINGS
See Network Settings

3.4: Picture Menu

MENU NAVIGATION
  • Use the Up and Down Arrow Keys to select desired menu item.
  • Use the Left and Right Arrow Keys to move through menu item options.
  • Press Enter or use the Right Arrow Key to select desired menu item option.
  • Press Menu to exit / return to previous screen.
PICTURE SETUP
  • Select Picture Mode

    Standard / Mild / Vivid / User

Note: Brightness, Contrast, Color, and Sharpness can only be adjusted in the User Picture Mode. Tint can only be adjusted when playing analog programs.

Adjust Brightness, Contrast, Color, Tint and Sharpness levels from 0 to 100.

  • Select Color Temperature

    Normal / Warm / Cool

ADVANCED PICTURE SETTINGS
  • Aspect Ratio

    Wide / Zoom / Cinema / Normal

    Adjust how the picture fills the screen.

  • Noise Reduction

    Low / Medium / High / Off

  • Dynamic Contrast

    On / Off

    Automatically adjust picture detail and brightness.

  • HDMI Mode

    Auto / Video / Graphic

    Note: HDMI Mode is only available in HDMI input.

3.5: Sound Menu

MENU NAVIGATION
  • Use the Up and Down Arrow Keys to select desired menu item.
  • Use the Left and Right Arrow Keys to move through menu item options.
  • Press Enter or use the Right Arrow Key to select desired menu item option.
  • Press Menu to exit / return to previous screen.
SOUND MENU
  • Select Sound Mode

    Standard / Music / Movie / Sports / Custom

  • Bass, Treble, Balance
    Note: Bass and Treble can only be adjusted in the User Picture Mode
  • Available Audio Language

    English / French / Spanish

  • Set Surround Sound

    On / Off

  • AVL

    On / Off

    Set the auto volume control.

3.6: Time Menu

Menu Navigation
  • Use the Up and Down Arrow Keys to select desired menu item.
  • Use the Left and Right Arrow Keys to move through menu item options.
  • Press Enter or use the Right Arrow Key to select desired menu item option.
  • Press Menu to exit / return to previous screen.
TIME SETUP
  • Sleep Timer

    On / Off

    Set a timer for the TV to turn off automatically.

    • Use Left and Right Arrow Keys to set the time before the TV automatically powers off.
    • Choose between 0 - 240 minutes.
  • Available Time Zone

    Central / Mountain / Pacific / Alaska / Hawaii / Samoa / Newfoundland / Atlantic / Eastern

  • Choose Daylight Savings

    On / Off

  • Select Time Format

    12 hour / 24 hour

  • Auto Clock

    On / Off

    Note: Only available in DTV. Clock can only be set manually or reset when Auto Clock is Off.

    Use to synchronize the display automatically.

3.7: Setup Menu

MENU NAVIGATION
  • Use the Up and Down Arrow Keys to select desired menu item.
  • Use the Left and Right Arrow Keys to move through menu item options.
  • Press Enter or use the Right Arrow Key to select desired menu item option.
  • Press Menu to exit / return to previous screen.
SETUP MENU
  • Available Menu Languages

    English / French / Spanish

  • OSD Timeout

    5 sec. / 15 sec. / 30 sec. / 45 sec. / 60 sec. / Off

    Adjusts the duration of the OSD menu.

  • Software Update (USB)

    Requires a USB flash drive with the appropriate update software file extracted to the root of the drive to be inserted into the TV’s USB Type-A port. This option is then selected to initiate the update process.

  • SW Information

    Display area for software version, Main Board part number, Checksum value, and Build Time

  • Console Auto On / Off

    Enable or disable the feature to turn On and Off a TV when a workout is started and ended respectively.

CLOSED CAPTION
  • Closed Caption (CC) Mode

    CC Off / CC On / CC On Mute

  • Available Analog Caption Types

    CC1 - CC4 / Text1 - Text4

  • Available Digital Caption Types

    Service1 - Service6

CLOSED CAPTION OPTIONS
Note: Closed Captioning Option only available with DTV, Components, or HDMI input selections. Default for CC selection is ON.
  • Digital CC Preset

    Default / Custom)

Note: The Mode sub-menu is shown / accessible only when Mode is set to Custom.
  • Available CC Font Styles

    Default / Font 0 - Font 7

  • Available CC Font Size

    Default / Normal / Small / Large

  • Available CC Font Edge Style

    Default / None / Raised / Depressed / Uniform / Left Shadow / Right Shadow

  • Available CC Font Edge Color

    Default / Black / White / Red / Green / Blue / Yellow / Magenta / Cyan

  • Available CC Foreground Color

    Default / White / Red / Green / Blue / Yellow / Magenta / Cyan

  • Available CC Background Color

    Default / Black / White / Red / Green / Blue / Yellow / Magenta

  • Available Foreground Opacity

    Default / Solid / Flashing / Translucent / Transparent

  • Available CC Background Opacity

    Default / Solid / Flashing / Translucent / Transparent

NETWORK SETTINGS
  • Device Static IP Address

    The static IP address for the TV is added here. The static IP address is provided by the facility manager, IT personnel, or the A/V integrator. This allows the TV to access the IPTV network. Each TV within the facility needs to have its own unique static IP address

  • Device MAC Address

    The MAC address is a unique address assigned at the manufacturer that serializes the TV on the network. The alphanumeric characters cannot be changed or altered. May be requested by the facility.

  • Network Packet Info

    Diagnostics utility to review the packet counts being transferred and received when connected to an IPTV network. Can assist with determining issues with connectivity.

  • VLAN

    On / Off

  • Selected VLAN ID

    VLAN IDs can be added to the TV configuration when required. Some IPTV networks do not require this feature.

    First cell is reserved for the Port VLAN ID or PVID. This is the VLAN number assigned to the network switch port the TV is directly connected to. Any additional VLANs that the TV must be aware of are inserted in the remaining 7 cells.

CLONE

Feature used to import and export channel list settings from one TV to another within a facility. Requires a USB flash drive which is inserted into the TV’s USB Type-A port before execution of these commands. The cloned channel list file name will be TVClone.dat

  • Import TV Channels & TV Settings (TVClone.dat)

    Requires a USB flash drive with an exported channel list. This option is then selected to initiate the import process.

  • Export TV Channels & TV Settings

    Requires a USB flash drive to be inserted into the TV’s USB Type-A port. This option is then selected to initiate the export process.

OTHER SETTINGS
  • Audio Only

    Play the audio with the picture turned off. Turn the Audio Only on and exit the OSD menu. The panel will be dark. Then press any key to exit the Audio Only Status.

    On / Off

  • Reset
    Note: For Setup Wizard, refer to INITIAL SETUP: SETUP WIZARD.

    Change power on options or reset TV to factory default. To restore default select YES or NO.

  • Update Splash Screen

    Process used during manufacturing.

3.8: Lock Menu

MENU NAVIGATION
  • Use the Up and Down Arrow Keys to select desired menu item.
  • Use the Left and Right Arrow Keys to move through menu item options.
  • Press Enter or use the Right Arrow Key to select desired menu item option.
  • Press Menu to exit / return to previous screen.
ENTER PASSWORD
  • Use the Down Arrow Key to highlight the password field.

  • Enter the default password 0000 or the changed 4-digit password. Contact Customer Support Services for password issues.
CHANGE PASSWORD
  • Enter current password.

  • Enter a new 4-digit password.
  • Re-enter new password to confirm. Use the Right Arrow Key to enter.
SYSTEM LOCK
Lock or unlock buttons on the TV.

On / Off

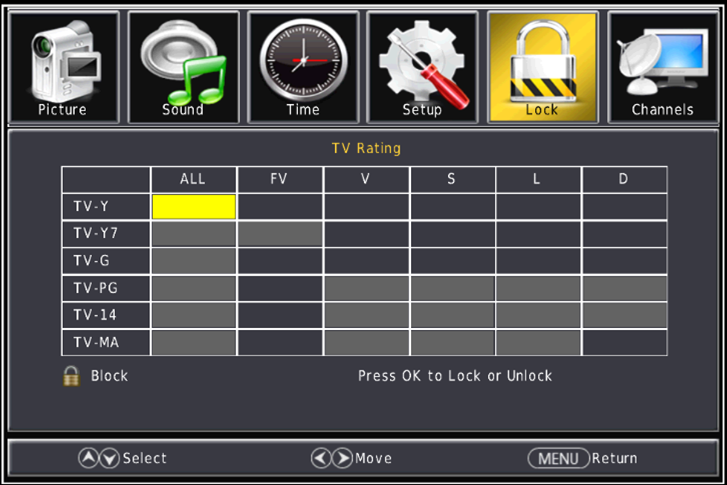
U.S. RATING - TV
  • Note: Only available when System Lock is On.
  • Restricts movies and TV programs by the U.S. content rating system. Press Enter to restrict / unrestrict.

Rating Audience
TV-Y This program is aimed at a very young audience, including children from ages 2–6.
TV-Y7 Programs designed for ages 7 and up.
TV-G General audiences
TV-PG Parental guidance is recommended; these programs may be unsuitable for younger children
TV-14 This program contains some material that many parents would find unsuitable for children under 14 years of age.
TV-MA Adult audiences only
Sub-Ratings
Rating Audience
D Suggestive dialogue
L Coarse / crude language
S Sexual content
V Violence
FV Fantasy violence (exclusive to TV-Y7 rated programs

CANADA RATING - TV
  • Note: Only available when System Lock is On.
  • The rating settings include Canada English and Canada French.

Canada English
Rating Audience
Exempt Programs that are exempt from ratings (news and sports)
C Children under the age of 8
CB+ Children 8 years and older
G General audience
PG Intended for general audiences, but may not be suitable for children under the age of 8.
14+ Viewers 14 and older
18+ Adult programming
Canada French
Rating Audience
G General audience
8+ Viewers 8 years old and up
13+ Viewers 13 years old and up
16+ Viewers 16 years old and up
18+ Viewers 18 years old an up
E Programs that are exempt from ratings (news and sports)

HOTEL MODE
Note: The following settings only work when Hotel Mode is set to On.

3.8.1: Lock Menu - Hotel Menu

MENU NAVIGATION
  • Use the Up and Down Arrow Keys to select desired menu item.
  • Use the Left and Right Arrow Keys to move through menu item options.
  • Press Enter or use the Right Arrow Key to select desired menu item option.
  • Press Menu to exit / return to previous screen.
HOTEL MENU: CHANNEL
  • Boot Source

    Last / TV / Hi-Def 1 / Hi-Def 2

  • Boot Channel

    Last

  • Tuner Lock

    On / Off

  • Direct Tuner Access

    On / Off

HOTEL MENU: OSD
  • Initial CC

    Last / CC Off / CC On / CC On Mute

  • Clear Vchip Password

    Execute clear command

  • Auto Reset Vchip

    Off / 4-hour / 8-hour / 12-hour / 24-hour

  • Clock Info Bar

    On / Off

HOTEL MENU: SOURCE
  • Input In Channel List
  • Source Lock

    Block input sources

    • TV: (Block / Unblock)
    • Hi-Def 1: (Block / Unblock)
    • Hi-Def 2: (Block / Unblock)
HOTEL MENU: VOLUME
  • Speaker

    On / Off

  • Default Volume

    Last / 0-100

  • Max Volume

    1-100

  • Min Volume

    0-99

HOTEL MENU: POWER MANAGEMENT
Auto Power On

On / Off

HOTEL MENU: KEY MANAGEMENT
Main Menu Lock

On / Off

3.9: Channels Menu

MENU NAVIGATION
  • Use the Up and Down Arrow Keys to select desired menu item.
  • Use the Left and Right Arrow Keys to move through menu item options.
  • Press Enter or use the Right Arrow Key to select desired menu item option.
  • Press Menu to exit / return to previous screen.
CHANNELS SETTINGS
  • TV Channel Remap Selection

    Sort channels by Virtual Number / Physical Number / Auto Index / Manual Index

  • TV Channel Number

    Show the channel number.

    • 1, 2, 3, etc. for Auto Index / Manual Index
    • 4-1, 4-2, 5-1, 5-2, etc. for Physical Number / Virtual Number
  • TV Channel List – Load from USB (IP_list.txt)

    Loads a Channel List from an inserted USB stick that has the IP_List.txt file. This file is edited on a PC to match the content provided over the IPTV network.

CHANNEL IP ADDRESS INPUT
UDP / RTP IP Channel Add

Insert the multicast IP address for each channel using the 4 cells (IP0 through IP3).

Note: Multicast IP range is 224.0.0.0 – 239.255.255.255

  • IP0: 224-239
  • IP1: 0-255
  • IP2: 0-255
  • IP3: 0-255

Insert the Port assignment for the IP address entered that matches the channel(s).

Note: Multiple channels can be placed on the same IP address and port assignment.

Select Enter on the remote when done to save channel. Repeat process for all channels.

Note: Manual channel entry must be done on one TV and then an import / export of the channel list can be done on all other TVs.
CHANNEL IP ADDRESS LIST & EDIT
Channel List

Menu to show full channel list and allow for editing

  • Delete: Press numeric 1 key
  • Add: Press numeric 2 key
  • Edit: Press numeric 3 key
  • Scan: Press numeric 4 key

Del: Delete highlighted channel.

Add: Brings up the Input Channel IP address menu to add a channel.

Edit: Brings up the UDP / RTP IP Edit menu to change the highlighted channels IP address or port number.

Scan: Searches highlighted IP address for all channels under the same IP address and port number. The scan results will be saved.

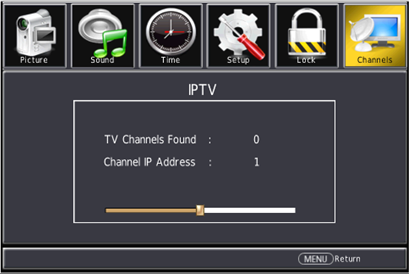
TV CHANNEL AUTO SCAN

Automatically searches for channels that have been created within the IP Channel List. Sub-menu with a Yes and No option will appear.

  • TV Channels Found: Total count of channels found during the scan process.
  • Channel IP Address: Displays current IP address being scanned into the TV.
TV CHANNEL EDIT

Menu to edit channel details and order.

Channel Edit

Menu to show full channel list and allow for editing.

  • Rename: Press numeric 1 key
  • Index Edit: Press numeric 2 key
  • Skip: Press numeric 3 key
  • Auto Sort: Press numeric 4 key
  • Fav: Press numeric 5 key

Rename: Brings up alphanumeric characters that can be selected and entered as the channel name.

Index Edit: Allows you to assign and change the channel order.

Skip: Used to disable a channel.

Auto Sort: Sorts the channel list based on the Index.

Fav: Used to tag certain channels to be added to the beginning of the channel list.

Chapter 4: Maintenance and Troubleshooting

The Cybex Attachable TV System requires little maintenance and has been designed to withstand the environment of a fitness facility. However, please review our suggestions on cleaning and troubleshooting your Cybex Attachable TV System.

4.1: Cleaning

Regularly (at least once a week) clean the Cybex Attachable TV and cardio equipment using mild soap and water. Lightly dampen a soft clean cloth with the mild soap and water solution and wipe the product. Do not use too much solution on the cloth and do not spray or pour any solution directly on the products. Doing so could cause damage to the LCD panel or remote controls.

Caution: Do not use liquid cleaners or aerosol cleaners to clean the screen. Do not use any solvents such as alcohol and paint thinner or acidic cleaners.

4.2: Approved and Compatible Cleaners

Two preferred cleaners have been approved by reliability experts: PureGreen 24 and Gym Wipes. Both cleaners will safely and effectively remove dirt, grime and sweat from equipment. PureGreen 24 and the Antibacterial Force formula of Gym Wipes are both disinfectants that are effective against MRSA and H1N1.

PureGreen 24 is available in a spray which is convenient for gym staff to use. Apply the spray to a microfiber cloth and wipe down the equipment. Use PureGreen 24 on the equipment for at least 2 minutes for general disinfection purposes and at least 10 minutes for fungus and viral control.

Gym Wipes are large, durable pre-moistened wipes to use on the equipment before and after workouts. Use Gym Wipes on the equipment for at least 2 minutes for general disinfection purposes.

Contact Customer Support Services to order these cleaners (1-800-351-3737 or email: customersupport@lifefitness.com).

Mild soap and water or a mild non-abrasive household cleaner can also be used to clean the display and all exterior surfaces. Use a soft microfiber cloth only. Apply the cleaner to the microfiber cloth before cleaning. DO NOT use ammonia or acid based cleaners. DO NOT use abrasive cleaners. DO NOT use paper towels. DO NOT apply cleaners directly to the equipment surfaces.

4.3: Troubleshooting

If you are having a problem with your TV, try the suggestions below. If the problem persists, contact Cybex Customer Support Services as outlined in the front of this manual.

Problem Possible Solutions
No picture, No sound
  • Make sure the power cord is plugged in.
  • Be sure the power is ON by pressing the On / Off button on the remote control.

  • Choose an alternate channel using the Channel Up / Down arrow keys.
  • If all channels are missing, check the Ethernet cable at all points to ensure it is connected within the equipment and to the IPTV head end.
  • Consult with IT administrator or A/V integrator for additional assistance.
Poor picture, Poor sound Consult with IT administrator or A/V integrator for additional assistance.
Screen does not turn on
  • Check the power supply converter output for 12 volts DC and replace if faulty.
  • Check the communication cable between the console and TV and replace if faulty.
No sound
  • Check the communication cable between the console and TV and replace if faulty.
  • Replace headphones.
  • Replace console headphone jack.
  • Replace TV.

4.4: Service

Any service, other than cleaning or user maintenance, must be performed by an authorized service representative.

For information about product service or operation, please contact Cybex Customer Service.

Important: Do not attempt to service any of the Attachable TV System products except the service described in this manual.

4.5: Returning Equipment to Cybex

To return equipment to Cybex for any reason, you must contact Cybex to obtain a return maintenance authorization (RMA) number (see page one for contact information).When you request an RMA number, please explain why you are returning the equipment.

Important: Equipment must be shipped with an RMA number in order for Cybex to process the return.

Chapter 5: Warranty

5.1: What is Covered

This Life Fitness commercial exercise equipment product is warranted to be free of all defects in material and workmanship.

5.2: Who is Covered

The original purchaser or any person receiving the product as a gift from the original purchaser. Warranty will be voided on subsequent transfers.

5.3: How long it is covered

All coverage is provided by specific Product according to the guidelines listed on the chart below.

Model 2 years 90 days
15” Attachable TV Electrical and mechanical parts. Labor

5.4: Who Pays Transportation and Insurance For Service

If the Product or any covered part must be returned to a service facility for repairs, We, Life Fitness , will pay all transportation and insurance charges for the first year. You are responsible for transportation and insurance charge after the first year.

5.5: What We Will Do To Correct Covered Defects

We will ship to you any new or rebuilt replacement part or component, or at our option, replace the Product. Such replacement parts are warranted for the remaining portion of the original warranty period.

5.6: What is Not Covered

Any failures or damage caused by unauthorized service, misuse, accident, negligence, improper assembly or installation, debris resulting from any construction activities in the Product’s environment, rust or corrosion as a result of the Product’s location, alterations or modifications without our written authorization or by failure on your part to use, operate and maintain the Product as set out in your Operation Manual (“Manual”).

One type RJ45 interchangeable Network ready and Fitness Entertainment port is supplied with the Product. This port complies with the FitLinxx CSAFE specification dated August 4, 2004 stating: 4.75 VDC to 10 VDC; maximum current of 85 mA. Any Product damage caused by a load exceeding this FitLinxx CSAFE specification is not covered by warranty.

All terms of this warranty are void if this product is moved beyond the continental borders of the United States of America (excluding Alaska, Hawaii and Canada) and are then subject to the terms provided by that country’s local authorized Life Fitness representative.

5.7: What You Must Do

Retain proof of purchase. Use, operate and maintain the as specified in the Manual; notify the place of purchase of any defect within 10 days after discovery of the defect; if instructed, return any defective part for replacement or, if necessary, the entire Product for repair. reserves the right to decide whether or not a product is to be returned for repair.

5.8: How To Get Parts And Service

Refer to Customer Service chapter of this manual for your local service contact information. Reference your name, address and the serial number of your . They will tell you how to get a replacement part, or, if necessary, arrange for service where your is located.

5.9: Exclusive Warranty

THIS LIMITED WARRANTY IS IN LIEU OF ALL OTHER WARRANTIES OF ANY KIND EITHER EXPRESSED OR IMPLIED, INCLUDING BUT NOT LIMITED TO THE IMPLIED WARRANTIES OF MERCHANTABILITY AND FITNESS FOR A PARTICULAR PURPOSE, AND ALL OTHER OBLIGATIONS OR LIABILITIES ON OUR PART. We neither assume nor authorize any person to assume for us any other obligation or liability concerning the sale of this Product. Under no circumstances shall we be liable under this warranty, or otherwise, of any damage to any person or property, including any lost profits or lost savings, for any special, indirect, secondary, incidental or consequential damages of any nature arising out of the use of or inability to use this Product. Some states do not allow the exclusion or limitation of implied warranties or of liability for incidental or consequential damages, so the above limitations or exclusions may not apply to you.

5.10: Changes in Warranty Not Authorized

No one is authorized to change, modify or extend the terms of this limited warranty.

5.11: Effects of State Laws

This warranty gives you specific legal rights, and you may have other rights which vary from state to state and country by country.