Hammer Strength

HD Air Bike

Assembly Instructions

PT-AB

1018932-0001 AC

Cover Image

i Corporate Headquarters

  • Columbia Centre III, 9525 Bryn Mawr Avenue, Rosemont, IL 60018 • U.S.A.
  • 847.288.3300 • FAX: 847.288.3703
  • Service phone number: 800.351.3737 (toll-free within U.S.A., Canada)
  • Global Website: www.lifefitness.com
International Offices

AMERICAS

North America

Life Fitness, LLC

EUROPE, MIDDLE EAST, and AFRICA (EMEA)

Belgium, Netherlands, and Luxemburg

Life Fitness (Atlantic) B.V.

All Other EMEA Countries and Distributor Business EMEA*

Life Fitness (Atlantic) B.V.

Brazil

Life Fitness Brasil

United Kingdom

Life Fitness UK LTD

ASIA PACIFIC (AP)

Japan

Life Fitness Japan, Ltd

Latin America and Caribbean*

Life Fitness, LLC

Germany, Austria, and Switzerland

Life Fitness Europe GMBH

Hong Kong

Life Fitness Asia Pacific LTD


Spain

Life Fitness IBERIA

All Other Asia Pacific countries and distributor business Asia Pacific*

Life Fitness Asia Pacific LTD

*Also check www.lifefitness.com for local representation or distributor/dealer

ii User and Service Documents Link

https://lfn.fit/KnowledgeBase

https://lfn.fit/PartStore

Additional information is available online using the links above.

English

.تتوفر معلومات إضافية على الإنترنت باستخدام الرابط أعلاه

Arabic, Saudi Arabia, Primary

点击上面的链接可在线获取更多信息。

Chinese, Simplified, Primary

Flere oplysninger er tilgængelige online gennem linket ovenfor.

Danish

Bijkomende informatie is online beschikbaar via bovenstaande link.

Dutch

Vous trouverez plus d'informations en ligne à l'aide du lien ci-dessus.

French

Zusätzliche Informationen finden Sie online über den oben angegebenen Link.

German

Ulteriori informazioni sono disponibili online utilizzando il link sopra riportato.

Italian

追加情報は上記リンクを使用してオンラインで利用可能です。

Japanese

상기 링크를 통해 온라인에서 추가 정보를 볼 수 있습니다.

Korean

Informações adicionais estão disponíveis on-line, através do link acima.

Portuguese, Brazil, Primary

Дополнительная информация доступна в интернете по ссылке, указанной выше.

Russian

Mediante el enlace anterior podrá acceder a información adicional en línea.

Spanish

Ytterligare information finns online genom att använda länken ovan.

Swedish

İnternet üzerinden daha fazla bilgi edinmek için yukarıdaki bağlantıyı kullanabilirsiniz.

Turkish

.هناك معلومات إضافية متاحة على الإنترنت باستخدام الرابط أعلاه

Arabic,Standard, Secondary

Informazio osagarria eskuragarri dago goiko estekaren bidez.

Basque

Допълнителна информация можете да намерите онлайн, като използвате връзката по-горе.

Bulgarian

Mitjançant l'enllaç anterior podreu accedir a informació addicional en línia.

Catalan

使用上面的連結線上提供額外資訊。

Chinese, Traditional, Secondary

Dodatne informacije možete pronaći na internetu sljedeći vezu iznad.

Croatian

ከላይ የተቀመጠውን አገናኝ(ሊንክ) በመጠቀም መረጃዎች ኦንላይን ያገኛሉ፡፡

Ethiopian

Lisätietoja on saatavissa verkosta käyttämällä yllä olevaa linkkiä.

Finnish

Wubetumi anya nsɛm afoforo aka ho wɔ wɛbsait so denam asɛm a ɛwɔ atifi hɔ a wubemia so so.

Ghana

Πρόσθετες πληροφορίες είναι διαθέσιμες ονλάιν χρησιμοποιώντας το σύνδεσμο παραπάνω.

Greek

.מידע נוסף אפשר לקבל באינטרנט באמצעות הקישור לעיל

Hebrew

További információ elérhető online, a fenti hivatkozás segítségével.

Hungarian

Viðbótarupplýsingar eru fáanlegar á netinu með því að smella á tengilinn hér fyrir ofan.

Icelandic

Plus indicium per superum situm potes invenire.

Latin

മുകളിലുള്ള ലിങ്ക് ഉപയോഗിച്ച് ഓൺലൈനിൽ കൂടുതല് വിവരങ്ങൾ ലഭ്യമാണ്.

Malayalam

Ytterligere informasjon er tilgjengelig på nettet via linken ovenfor.

Norwegian Nyorsk

Dodatkowe informacje są dostępne online pod powyższym odnośnikiem.

Polish

Informações adicionais estão disponíveis online a usar o link acima.

Portuguese, Portugal, Secondary

Informații suplimentare sunt disponibile online, utilizând link-ul de mai sus.

Romanian

Dodatne informacije dostupne su na mreži putem gornjeg linka.

Serbian

Ďalšie informácie sú dostupné online na vyššie uvedenom odkaze.

Slovak

TradeMarkList Gym Wipes, PureGreen 24, Polar

Life Fitness® is a registered trademark.

Gym Wipes® is a registered trademark of the 2XL Corporation. PureGreen 24 is a trademark of Pure Green. Polar® is a registered trademark of Polar Electro Inc.

Chapter 1: Safety

1.1: Safety Instructions

Owner of the equipment is responsible for providing the users of the equipment with all warnings and instructions.

Read all instructions before use.

Caution: Any changes or modifications to this equipment could void the product warranty.
Warning: Health-related injuries may result from incorrect or excessive use of exercise equipment. Life Fitness STRONGLY recommends seeing a physician for a complete medical exam before undertaking an exercise program, particularly if the user has a family history of high blood pressure or heart disease, is over the age of 45, smokes, has high cholesterol, is obese, or has not exercised regularly in the past year. If, at any time while exercising, the user experiences faintness, dizziness, pain, or shortness of breath, he or she must stop immediately.
Warning: To reduce the risk of burns, fire, electric shock, or injury, it is imperative to connect each product to a properly grounded electrical outlet.
Warning: Heart rate monitoring systems may be inaccurate. Over exercising may result in serious injury or death. If you feel faint, stop exercising immediately.
Warning: Do not use for stretching and do not attach straps or other devices.
Warning: Allow a distance of 16 in. / 41 cm between the widest part of the bike and other objects on either side. Provide at least 3 ft. / 0.9 m between the front or rear of the bike to any other objects and 2 ft. / 0.6 m in the direction the equipment is accessed from.
Warning: Keep batteries out of reach of children.

Some chest straps may contain a removable battery.

  • Swallowing may lead to serious injury in as little as 2 hours or death, due to chemical burns and potential perforation of the esophagus.
  • If you suspect your child has swallowed a battery, immediately call your local poison control for fast, expert advice.
  • Examine devices and make sure the battery compartment is correctly secured, e.g. that the screw or other mechanical fastener is tightened. Do not use if compartment is not secure.
  • Dispose of used button batteries immediately and safely. Flat batteries can still be dangerous.
  • Tell others about the risk associated with button batteries and how to keep their children safe.
Warning: Batteries may not be exploited to fire or get into contact with other metal objects. If you don´t use the equipment for a longer period of time, remove batteries to avoid any damage by leaking or corroding batteries. If battery is depleted, insert new batteries into the equipment. If battery has leaked, remove all residue immediately. Avoid contact with eyes and if you come in contact with residue, wash thoroughly.
Warning: If rechargeable batteries are in use, they must be removed from the equipment for recharging. The charged battery must deliver 1.5 V output.
Warning: Never use batteries other than D-Cell (LR-20) batteries. Do not use different battery types or depleted and new batteries together.
Warning: Always insert batteries with correct polarity.
Warning: Do not attempt to recharge non rechargeable batteries.
Warning: Never short circuit battery connection terminals.
Warning: Children shall not play with the training equipment.
Warning: Cleaning and user maintenance shall not be made by children without supervision.
  • Life Fitness does not warrant nor guarantee that component parts used in the manufacture of products offered under the Life Fitness brand are latex-free. Users of these products must take all necessary precautions to prevent accidental contact that could lead to an adverse latex reaction.
  • Always follow the console instructions for proper operation.
  • This appliance is not intended for use by persons (including children) with reduced physical, sensory, or mental capabilities, or lack of experience or knowledge unless they have supervision or been given instruction concerning the use of the appliance by a person responsible for their safety.
  • Do not use this product outdoors, near swimming pools or in areas of high humidity.
  • Never operate the product with the air openings blocked. Keep air openings free of lint, hair, or any other obstructing material.
  • Never place liquids of any type directly on the unit, except in an accessory tray or holder. Containers with lids are recommended.
  • Do not use these products in bare feet. Always wear shoes. Wear shoes with rubber or high-traction soles. Do not use shoes with heels, leather soles, cleats or spikes. Make sure no stones are embedded in the soles.
  • Keep all loose clothing, shoelaces, and towels away from moving parts.
  • Do not reach into, or underneath, the unit or tip it on its side during operation.
  • This equipment is not intended for use by children. Keep children under the age of 14 away from the machine.
  • Do not allow other people to interfere in any way with the user or equipment during a workout.
  • Allow LCD consoles to “normalize” with respect to temperature for one hour before plugging the unit in and using.
  • When the product is not in use, Life Fitness recommends unplugging the product. Disconnect from the electrical outlet when not in use, and before putting on or taking off parts.
  • Use these products for their intended use as described in this manual. Do not use attachments that have not been recommended by the manufacturer.
  • Free standing equipment shall be positioned on a flat, stable and horizontal base.
  • Do not stand or sit on plastic shrouds.
  • Use caution when mounting or dismounting the bike. Use the stationary handlebar whenever additional stability is required.
  • Read all warnings on each product prior to starting a workout.
  • If warnings are missing or damaged, please contact Customer Support Services immediately for replacement warning labels. Warning labels are shipped with every product and should be installed before product is used. Life Fitness is not responsible for missing or damaged warning labels.

1.2: Consignes de Sécurité

Veuillez lire toutes les instructions avant usage.

Caution: Toute modification apportée à cet équipement pourrait en annuler la garantie.
Warning: Des problèmes de santé peuvent survenir en cas d’une utilisation incorrecte ou excessive de l'équipement. Life Fitness Recommande VIVEMENT aux utilisateurs de passer un examen médical complet avant d'entamer un programme d'entraînement, et tout particulièrement dans les cas suivants : antécédents familiaux d'hypertension (pression sanguine trop élevée) ou de pathologies cardiaques, utilisateurs de 45 ans ou plus, tabagisme, hypercholestérolémie (taux de cholestérol sanguin trop élevé), obésité, absence d'exercice physique depuis un an ou plus. Si, pendant l'usage de l'appareil, l'utilisateur éprouve un malaise, des vertiges, des douleurs ou des difficultés à respirer, il doit s'arrêter immédiatement.
Warning: Pour réduire les risques de brûlures, d’incendies, de décharges électriques ou de blessures, il est essentiel de brancher chaque appareil sur une prise électrique correctement mise à la terre.
Warning: Les systèmes de surveillance de la fréquence cardiaque peuvent être inexacts. Un exercice trop intensif peut entraîner des blessures graves, voire mortelles. En cas de malaise, interrompez immédiatement la séance d’entraînement.
Warning: Ne pas utiliser pour des étirements et ne pas y attacher des sangles ou autres dispositifs.
Warning: Tenir les piles hors de portée des enfants.

Certaines sangles de poitrine peuvent contenir une pile jetable.

  • L’ingestion de la pile peut provoquer des blessures graves voire la mort en moins de 2 heures en raison du risque de brûlures chimiques et de perforation de l’œsophage.
  • Si vous pensez que votre enfant a avalé une pile, contactez immédiatement le centre anti-poison local pour obtenir des conseils spécifiques.
  • Contrôlez l'appareil et assurez-vous que le compartiment pour pile est bien fermé, par exemple que la vis ou toute autre fixation mécanique est bien serrée. Ne pas utiliser le produit si le compartiment n'est pas bien fermé.
  • Éliminer les piles bouton immédiatement et de manière sûre. Les piles bouton sont une source de danger.
  • Informez les tiers des risques associés aux piles bouton et de la manière dont ils doivent agir pour protéger leurs enfants.
Warning: Laissez une distance de 41 cm (16 po) entre la partie la plus large du vélo et les objets se trouvant de part et d’autre. Laissez un dégagement d’au moins 90 cm (3 pieds) entre l’avant ou l’arrière du vélo et les objets alentour, et d’au moins 60 cm (2 pieds) dans la direction qui permet d’accéder à l’appareil.
Danger: Pour réduire les risques de chocs électriques ou de blessures en raison des pièces mobiles, débranchez toujours les produits avant de les nettoyer ou de procéder aux tâches d’entretien.
  • Pour un fonctionnement correct, suivez toujours les instructions de la console.
  • Cet appareil n’est pas destiné à être utilisé par des personnes ou des enfants présentant des capacités physiques, sensorielles ou mentales réduites, ou un manque d’expérience et de connaissances, sauf en cas de supervision ou d’instructions relatives à son utilisation par une personne responsable de leur sécurité.
  • N’utilisez pas ce produit à l’extérieur, près d’une piscine ou dans des endroits très humides.
  • N’utilisez jamais le produit avec les ouvertures d’air bloquées. Maintenez les bouches d’aération exemptes de peluches, de cheveux ou de toute autre obstruction.
  • Ne placez jamais de liquides d’aucune sorte directement sur l’appareil, sauf si vous disposez d’un support ou d’un plateau pour accessoires. Nous vous recommandons de n’utiliser que des récipients pourvus d’un couvercle.
  • N’utilisez pas ces produits avec les pieds nus. Portez toujours des chaussures. Portez des chaussures à semelles en caoutchouc ou antidérapantes. N’utilisez pas de chaussures à talon, à semelle en cuir, à crampons ou à pointes. Assurez-vous qu’aucun caillou ne s’est incrusté dans les semelles.
  • Éloignez les vêtements amples, les lacets de chaussure et les serviettes des parties mobiles de l’appareil.
  • Ne placez pas les mains à l’intérieur ou sous l’appareil. Ne le faites pas basculer sur le côté durant son fonctionnement.
  • Cet équipement n’est pas destiné à être utilisé par les enfants. Tenez les enfants âgés de moins de 14 ans à l’écart de la machine.
  • Ne laissez aucune personne gêner l’utilisateur ou le fonctionnement de l’appareil pendant l’exercice.
  • Laissez les consoles LCD s’adapter à la température ambiante pendant une heure avant de brancher l’appareil et de l’utiliser.
  • Life Fitness recommande de débrancher le produit quand il n’est pas utilisé. Débranchez-le systématiquement après son utilisation et avant l’ajout et le retrait de pièces.
  • Utilisez cet équipement uniquement aux fins auxquelles il est destiné et de la manière décrite dans le présent manuel. N’utilisez pas d’accessoires non recommandés par le fabricant.
  • Les équipements autonomes doivent être placés sur une base plane, stable et horizontale.
  • Ne vous mettez pas debout ni assis sur les caches en plastique.
  • Montez et descendez avec précaution du vélo. Utilisez les poignées fixes lorsque vous avez besoin de renforcer votre équilibre.
  • Lisez les avertissements sur chaque produit avant de commencer à vous entraîner.
  • Si certaines étiquettes d’avertissement sont manquantes ou endommagées, contactez immédiatement le service d’assistance à la clientèle. Nous vous en fournirons de nouvelles. Les étiquettes d’avertissement sont expédiées avec les appareils et doivent être installées avant utilisation de ces derniers. Life Fitness n’est pas responsable des étiquettes manquantes ou endommagées.

1.3: Biomechanical Positioning

The user shall be positioned by grasping grips of moving arms, feet on pedals, and sitting on seat.

Item Description Qty
1 Moving arm grips 2
2 Seat 1
3 Pedal 2

This product is designed to exercise the major muscle groups in the upper and lower body.

Warning: Injuries to health may result from incorrect or excessive training.

1.4: Disposing of Batteries

Batteries may not:

  • Come into contact with fire.
  • Come into contact with coins or other metallic objects.

Products or batteries labeled with this symbol may not be disposed of along with normal household refuse. For proper disposal, please find out about the applicable laws or guidelines on disposing of electrical devices and batteries in your local area and adhere to them.

Chapter 2: Getting Started

2.1: Free Area and Training Area

  1. Read the entire manual before setting up the bike.
  2. After following all Safety Instructions, move the bike to the location where it will be used.
  3. Allow a Free Area clearance of 2 ft. (0.6 m) in the directions the bike is accessed from and a Training Area of 3 ft. (1 m) between the front or rear of the bike or any other objects.

    Free Area and Training Area

2.2: How to Stabilize Bike

After placing the unit in position, check the unit’s stability by attempting to rock it from side to side. Any slight rocking indicates that the unit must be leveled.
  1. Determine which foot is not resting completely on the floor.
  2. Rotate the stabilizing foot in the threaded stud to lower it.
    Item Description
    1 Stabilizing leg
    2 Threaded stud
  3. Verify that the bike is stable, and repeat the adjustment as necessary until the unit no longer rocks.

2.3: Water Bottle Holder (optional)

A standard bicycle water bottle holder can be installed on the mounting bolts on console upright. Water bottle holders are not available through Hammer Strength.

Item Description Qty
1 Mounting bolt 2
2 Console upright 1

Chapter 3: Assembly

3.1: Hardware and Tools Required

Hardware:
Item Description Qty.
1 Bolt, M8 x 20 mm hex head 12
2 Washer, M8 x 19 mm 12
3 Washer, moving arm 2
4 Bolt, M12 x 130 mm socket head 2
Tools Required:
  • Phillips screwdriver
  • 6 mm Allen wrench
  • 10 mm Allen wrench
  • 13 mm socket wrench
  • 15 mm pedal wrench
  • Torque wrench

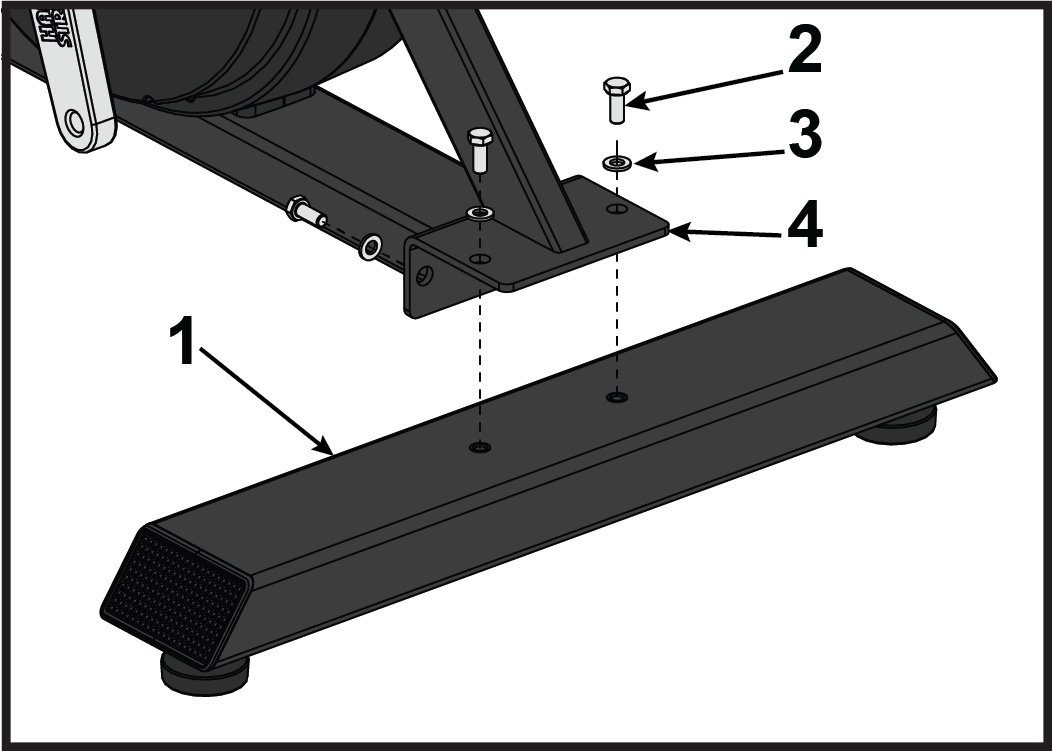
3.2: Install Front Stabilizer

  1. Install bolts and washers securing front stabilizer to base assembly using a 13 mm socket wrench. Torque to 15 ft-lbs.
    Note: Two bolts and washers on top of front stabilizer and two on side.
    Item Description Qty
    1 Front stabilizer 1
    2 Bolt, M8 x 20 mm hex head 4
    3 Washer, M8 x 19 mm 4
    4 Base Assembly 1

3.3: Install Rear Stabilizer

  1. Install bolts and washers securing rear stabilizer to base assembly using a 13 mm socket wrench. Torque to 15 ft-lbs.
    Note: Two bolts and washers on top of rear stabilizer and two on side.
    Item Description Qty
    1 Rear stabilizer 1
    2 Bolt, M8 x 20 mm hex head 4
    3 Washer, M8 x 19 mm 4
    4 Base Assembly 1

3.4: Install Moving Arms

  1. Make note of correct direction of left and right moving arms.
    Item Description Qty
    1 Right moving arm 1
    2 Left moving arm 1
  2. Install washer on left moving arm shaft.
    Item Description Qty
    1 Left moving arm assembly 1
    2 Washer 1
    3 Moving arm shaft 1
  3. Slide left moving arm assembly fully onto moving arm shaft.
    Note: Moving arm assembly includes lower clamp and six bolts partially threaded into moving arm.
  4. Tighten all six bolts evenly, while keeping spacing even between moving arm and lower clamp, using a 6 mm Allen wrench. Torque to 25 ft-lbs.
    Item Description Qty
    1 Moving arm 1
    2 Spacing between moving arm and lower clamp 2
    3 Bolt 6
    4 Moving arm shaft 1
    5 Lower clamp 1
  5. Install washer on right moving arm shaft.
    Item Description Qty
    1 Right moving arm assembly 1
    2 Washer 1
    3 Moving arm shaft 1
  6. Slide right moving arm assembly fully onto moving arm shaft.
  7. Tighten all six bolts evenly, while keeping spacing even between moving arm and lower clamp, using a 6 mm Allen wrench. Torque to 25 ft-lbs.

3.5: Install Foot Pegs

  1. Install bolt securing left foot peg to moving arm shaft using a 10 mm Allen wrench. Torque to 55 ft-lbs.
    Note: Left and right foot pegs are the same.
    Item Description Qty
    1 Foot peg 2
    2 Bolt, M12 x 130 mm socket head 2
    3 Moving arm shaft 2
  2. Install bolt securing right foot peg to moving arm shaft using a 10 mm Allen wrench. Torque to 55 ft-lbs.

3.6: Install Pedals

  1. Install left pedal to crank arm using a 15 mm pedal wrench. Torque to 55 NM.
    Note: The left and right pedals are threaded differently. The left pedal is a left hand thread. The right pedal is a right hand thread.
    Left pedal shown
    Item Description Qty
    1 Left pedal 1
    2 Crank arm 1
  2. Install right pedal to crank arm using a 15 mm pedal wrench. Torque to 55 NM.

3.7: Install Console Upright

  1. Place console upright in position and plug upper console cable into lower console cable.
    Item Description Qty
    1 Console upright 1
    2 Upper console cable 1
    3 Lower console cable 1
    4 Base assembly 1
  2. Lower console upright onto base assembly.
    Caution: Do not pinch console cable.
    Item Description Qty
    1 Console upright 1
    2 Bolt, M8 x 20 mm hex head 4
    3 Washer, M8 x 19 mm 4
    4 Base assembly 1
  3. Install four bolts and four washers securing console upright to base assembly using a 13 mm socket wrench. Torque to 15 ft-lbs (20 Nm).

3.8: Install Batteries

  1. Remove four screws securing battery cover to console upright using a Phillips screwdriver.
    Item Description Qty
    1 Console upright 1
    2 Screw 4
    3 Battery cover 1
    4 Battery, D cell 2
  2. Install two D cell batteries into battery holder in console upright.
    Note: Make sure batteries are installed in the correct direction.
  3. Install four screws securing battery cover to console upright using a Phillips screwdriver. Torque to 8-10 in-lbs (0.9 - 1.13 Nm).

3.9: Set Elevation for Products Location

Perform this procedure to display the correct resistance levels. The resistance is based on air densities at different elevations. This is required when installing the unit, replacing the console, or if the unit has been moved to a different elevation.
  1. Turn the console on by pedaling or moving the handles.
  2. Press the MENU button on the console to access the PROGRAMS screen.
  3. Press the MENU button and the UP ARROW button simultaneously for 3 seconds to enter the SETTINGS menu.
    Item Description Qty
    1 MENU 1
    2 UP ARROW 1
  4. Press the DOWN ARROW button to navigate to SYSTEM menu.
  5. Press the OK ARROW to select.
  6. Press the DOWN ARROW button to navigate to ELEVATION menu.
  7. Select elevation value closest to current location of the bike.
  8. Press the OK ARROW to select.
  9. Press EXIT to exit settings.

Chapter 4: Specifications

4.1: Specifications

Designed Use EN ISO 20957-1, EN ISO 20957-5, Product Class S A, (0 – 80 RPM / 40 – 350 Watt)
Maximum User Weight 350 lbs. / 159 kg
Drive Type Belt
Power Requirements Battery power console. Two D cell batteries.
Heart Rate Wireless heart rate using an Analog signal.
  Physical Dimensions Shipped Dimensions
Length 55 in. / 140 cm

(with seat at highest and farthest back position)

53.1 in. / 135 cm
Width 28.5 in. / 72.5 cm 14.7 in. / 37.5cm
Height 54.5 in. / 138.4 cm 34.6 in. / 88 cm
Weight 166 lbs. / 75.5 kg 184.7 lbs. / 83.8 kg