Life Fitness

Life Fitness Run CX Treadmill

Owner's Manual/Assembly Instructions

(RRR-TR-0000-01)

1017719-0001 AA

Cover Image

i Corporate Headquarters

  • Columbia Centre III, 9525 Bryn Mawr Avenue, Rosemont, IL 60018 • U.S.A.
  • 847.288.3300 • FAX: 847.288.3703
  • Service phone number: 800.351.3737 (toll-free within U.S.A., Canada)
  • Global Website: www.lifefitness.com
International Offices

AMERICAS

North America

Life Fitness, LLC

EUROPE, MIDDLE EAST, and AFRICA (EMEA)

Belgium, Netherlands, and Luxemburg

Life Fitness (Atlantic) B.V.

All Other EMEA Countries and Distributor Business EMEA*

Life Fitness (Atlantic) B.V.

Brazil

Life Fitness Brasil

United Kingdom

Life Fitness UK LTD

ASIA PACIFIC (AP)

Japan

Life Fitness Japan, Ltd

Latin America and Caribbean*

Life Fitness, LLC

Germany, Austria, and Switzerland

Life Fitness Europe GMBH

Hong Kong

Life Fitness Asia Pacific LTD


Spain

Life Fitness IBERIA

All Other Asia Pacific countries and distributor business Asia Pacific*

Life Fitness Asia Pacific LTD

*Also check www.lifefitness.com for local representation or distributor/dealer

ii User and Service Documents Link

https://lfn.fit/KnowledgeBase

https://lfn.fit/PartStore

Additional information is available online using the links above.

English

.تتوفر معلومات إضافية على الإنترنت باستخدام الرابط أعلاه

Arabic, Saudi Arabia, Primary

点击上面的链接可在线获取更多信息。

Chinese, Simplified, Primary

Flere oplysninger er tilgængelige online gennem linket ovenfor.

Danish

Bijkomende informatie is online beschikbaar via bovenstaande link.

Dutch

Vous trouverez plus d'informations en ligne à l'aide du lien ci-dessus.

French

Zusätzliche Informationen finden Sie online über den oben angegebenen Link.

German

Ulteriori informazioni sono disponibili online utilizzando il link sopra riportato.

Italian

追加情報は上記リンクを使用してオンラインで利用可能です。

Japanese

상기 링크를 통해 온라인에서 추가 정보를 볼 수 있습니다.

Korean

Informações adicionais estão disponíveis on-line, através do link acima.

Portuguese, Brazil, Primary

Дополнительная информация доступна в интернете по ссылке, указанной выше.

Russian

Mediante el enlace anterior podrá acceder a información adicional en línea.

Spanish

Ytterligare information finns online genom att använda länken ovan.

Swedish

İnternet üzerinden daha fazla bilgi edinmek için yukarıdaki bağlantıyı kullanabilirsiniz.

Turkish

.هناك معلومات إضافية متاحة على الإنترنت باستخدام الرابط أعلاه

Arabic,Standard, Secondary

Informazio osagarria eskuragarri dago goiko estekaren bidez.

Basque

Допълнителна информация можете да намерите онлайн, като използвате връзката по-горе.

Bulgarian

Mitjançant l'enllaç anterior podreu accedir a informació addicional en línia.

Catalan

使用上面的連結線上提供額外資訊。

Chinese, Traditional, Secondary

Dodatne informacije možete pronaći na internetu sljedeći vezu iznad.

Croatian

ከላይ የተቀመጠውን አገናኝ(ሊንክ) በመጠቀም መረጃዎች ኦንላይን ያገኛሉ፡፡

Ethiopian

Lisätietoja on saatavissa verkosta käyttämällä yllä olevaa linkkiä.

Finnish

Wubetumi anya nsɛm afoforo aka ho wɔ wɛbsait so denam asɛm a ɛwɔ atifi hɔ a wubemia so so.

Ghana

Πρόσθετες πληροφορίες είναι διαθέσιμες ονλάιν χρησιμοποιώντας το σύνδεσμο παραπάνω.

Greek

.מידע נוסף אפשר לקבל באינטרנט באמצעות הקישור לעיל

Hebrew

További információ elérhető online, a fenti hivatkozás segítségével.

Hungarian

Viðbótarupplýsingar eru fáanlegar á netinu með því að smella á tengilinn hér fyrir ofan.

Icelandic

Plus indicium per superum situm potes invenire.

Latin

മുകളിലുള്ള ലിങ്ക് ഉപയോഗിച്ച് ഓൺലൈനിൽ കൂടുതല് വിവരങ്ങൾ ലഭ്യമാണ്.

Malayalam

Ytterligere informasjon er tilgjengelig på nettet via linken ovenfor.

Norwegian Nyorsk

Dodatkowe informacje są dostępne online pod powyższym odnośnikiem.

Polish

Informações adicionais estão disponíveis online a usar o link acima.

Portuguese, Portugal, Secondary

Informații suplimentare sunt disponibile online, utilizând link-ul de mai sus.

Romanian

Dodatne informacije dostupne su na mreži putem gornjeg linka.

Serbian

Ďalšie informácie sú dostupné online na vyššie uvedenom odkaze.

Slovak

TradeMarkList Gym Wipes, PureGreen 24

Life Fitness® is a registered trademark.

Gym Wipes® is a registered trademark of the 2XL Corporation. PureGreen 24 is a trademark of Pure Green.

Chapter 1: Safety

1.1: Safety Instructions

Owner of the equipment is responsible for providing the users of the equipment with all warnings and instructions.

Read all instructions before use.

Caution: Any changes or modifications to this equipment could void the product warranty.
Caution: Risk of injury to persons – to avoid injury, use extreme caution when stepping onto or off of a moving belt. Read assembly instruction manual before using.
Warning: Health-related injuries may result from incorrect or excessive use of exercise equipment. Life Fitness STRONGLY recommends seeing a physician for a complete medical exam before undertaking an exercise program, particularly if the user has a family history of high blood pressure or heart disease, is over the age of 45, smokes, has high cholesterol, is obese, or has not exercised regularly in the past year. If, at any time while exercising, the user experiences faintness, dizziness, pain, or shortness of breath, he or she must stop immediately.
Warning: To reduce the risk of burns, fire, electric shock, or injury, it is imperative to connect each product to a properly grounded electrical outlet.
Warning: Heart rate monitoring systems may be inaccurate. Over exercising may result in serious injury or death. If you feel faint, stop exercising immediately.
Warning: Keep the area 6.5 ft. / 2 m by 3 ft. / 0.9 m behind the treadmill clear of any obstructions, including walls, furniture, and other equipment. Contact Customer Support Services for an optional longer power cord if necessary.
Warning: Be sure the emergency stop lanyard is clipped to the user and in proper position on the treadmill before beginning any workout.
Warning: The belt centering adjustment must be performed if the belt is not between the marks indicating the maximum allowed lateral positions. Refer to Treadmill Assembly Instructions.
Warning: This product can expose you to chemicals including Acrylonitrile, which is known to the State of California to cause cancer and birth defects or other reproductive harm. For more information go to http://www.P65Warnings.ca.gov
Danger: To reduce the risk of electrical shock or injury from moving parts, always unplug product before cleaning or attempting any maintenance activity.
  • Life Fitness does not warrant nor guarantee that component parts used in the manufacture of products offered under the Life Fitness brand are latex-free. Users of these products must take all necessary precautions to prevent accidental contact that could lead to an adverse latex reaction.
  • Never operate the product if it has a damaged power cord or electrical plug, or if it has been dropped, damaged, or even partially immersed in water. Contact Customer Support Services.
  • Position the product so that the power cord plug to the wall is accessible to the user. Make sure that the power cord is not knotted or twisted and that it is not trapped under any equipment or other objects.
  • If the electrical supply cord is damaged, it must be replaced by the manufacturer, an authorized service agent, or a similarly qualified person to avoid a hazard.
  • Always follow the console instructions for proper operation.
  • This appliance is not intended for use by persons (including children) with reduced physical, sensory, or mental capabilities, or lack of experience or knowledge unless they have supervision or been given instruction concerning the use of the appliance by a person responsible for their safety.
  • Do not use this product outdoors, near swimming pools or in areas of high humidity.
  • Never operate the product with the air openings blocked. Keep air openings free of lint, hair, or any other obstructing material.
  • Never insert objects into any opening in these products. If an object should drop inside, turn off the power, unplug the power cord from the outlet, and carefully retrieve it. If the item cannot be reached, contact Customer Support Services.
  • Never place liquids of any type directly on the unit, except in an accessory tray or holder. Containers with lids are recommended.
  • Do not use these products in bare feet. Always wear shoes. Wear shoes with rubber or high-traction soles. Do not use shoes with heels, leather soles, cleats or spikes. Make sure no stones are embedded in the soles.
  • Keep all loose clothing, shoelaces, and towels away from moving parts.
  • Do not reach into, or underneath, the unit or tip it on its side during operation.
  • This equipment is not intended for use by children. Keep children under the age of 14 away from the machine.
  • Do not allow other people to interfere in any way with the user or equipment during a workout.
  • Allow LCD consoles to “normalize” with respect to temperature for one hour before plugging the unit in and using.
  • When the product is not in use, Life Fitness recommends unplugging the product. Disconnect from the electrical outlet when not in use, and before putting on or taking off parts. To disconnect, turn power OFF at the ON/OFF switch, then remove plug from electrical outlet.
  • Keep the power cord away from heated surfaces. Do not pull the equipment by the power cord or use the cord as a handle. Do not run the power cord on the floor under or along the side of the treadmill.
  • Handrails may be held to enhance stability as needed, but are not for continuous use.
  • Never mount or dismount the treadmill while the running belt is moving. Use the handrails whenever additional stability is required. In case of an emergency, such as tripping, grasp the handrails, and place the feet on the side platforms.
  • Never walk or jog backwards on the treadmill.
  • Do not use this product in areas where aerosol spray products are being used or where oxygen is being administered. Such substances create the danger of combustion and explosion.
  • Use these products for their intended use as described in this manual. Do not use attachments that have not been recommended by the manufacturer.
  • In conformity with the European Union Machinery Directive 2006/42/EC, this equipment unloaded runs at sound pressure levels below 70 dB (A) at the average operating speed of 12 km/hr (commercial units) and 8 km/hr (home units). Noise emission under load is higher than without load.
  • Free standing equipment shall be positioned on a flat, stable and horizontal base.
  • Read all warnings on each product prior to starting a workout.
  • If warnings are missing or damaged, please contact Customer Support Services immediately for replacement warning labels. Warning labels are shipped with every product and should be installed before product is used. Life Fitness is not responsible for missing or damaged warning labels.
Warning: Do not use for stretching and do not attach straps or other devices.
Warning: Keep batteries out of reach of children.

Some chest straps may contain a removable battery.

  • Swallowing may lead to serious injury in as little as 2 hours or death, due to chemical burns and potential perforation of the esophagus.
  • If you suspect your child has swallowed a battery, immediately call your local poison control for fast, expert advice.
  • Examine devices and make sure the battery compartment is correctly secured, e.g. that the screw or other mechanical fastener is tightened. Do not use if compartment is not secure.
  • Dispose of used button batteries immediately and safely. Flat batteries can still be dangerous.
  • Tell others about the risk associated with button batteries and how to keep their children safe.

1.2: Electrical Power Requirements

The treadmill requires a dedicated line with isolated neutral according to the electrical configurations listed in the chart below.

Supply Voltage Frequency (Hz) Maximum Current (Amps)
120 50 / 60 12
230 50 / 60 10
Note: Do not modify the plug provided with this product. If the plug does not fit into an available electrical outlet, have a proper outlet installed by a qualified electrician.

1.3: Grounding Instructions

This product must be properly grounded. If the unit malfunctions or breaks down, proper grounding provides a path of least resistance for the electric current, which reduces the risk of shock to anyone touching or using the equipment. Each unit is equipped with an electrical cord, which includes an equipment grounding conductor and a grounding plug. The plug must be inserted into an outlet that has been properly installed and grounded in accordance with all local codes and ordinances.
Warning: A temporary adapter MUST NOT BE USED to connect this plug to a two-pole receptacle in North America. If a properly grounded, 15-amp outlet is not available, one must be installed by a qualified electrician. (Consumer Units Only).
Danger: A risk of electrical shock may result from improper connection of the equipment-grounding conductor. Check with a qualified electrician if in doubt as to proper grounding technique. DO NOT modify the plug provided with the product. If it will not fit an electrical outlet, have a proper outlet installed by a qualified electrician. Any modification to the electrical plug will result in a voided warranty.

Chapter 2: Getting Started

2.1: Power Switch

Located on the front panel at the base of the treadmill, the ON/OFF switch has two positions: "l" (one) for ON and "0" (zero) for OFF.

2.2: Turning the Unit On

To turn the treadmill on, locate the ON/OFF power switch at the front of the treadmill and turn it ON.

2.3: Stride Sensor Auto Shutoff System

The Stride Sensor auto-shutoff system detects whether a user is on the belt/deck. If the user leaves the belt/deck during a workout, the system is triggered and the following message is displayed, User not detected on belt - press “OK” to continue workout. If the user presses OK during this message the workout will continue without interruption. If the user does not press OK another message will be displayed, User not detected on belt; RESUME WORKOUT / EXIT WORKOUT. At this point power to the belt will shut off as the treadmill enters Pause mode. If the user presses RESUME WORKOUT during the second message the workout will be resumed. If the user does not press RESUME WORKOUT, the treadmill will continue in Pause mode and eventually end the workout. This feature can be disabled in the Manager’s Configuration.

Chapter 3: Product Overview

3.1: Index

Item Description Qty.
1 Handlebar 2
2 Emergency Stop Lanyard 1
3 Contact Heart Rate Sensors 2
4 Activity Zone 1
5 Cup Holder 2
6 USB Port 1
7 Console 1
8 Upright Assembly 2
9 Rear Roller Adjustment Bolt 2
10 Walking Belt 1
11 Side Rail 2
12 On/Off Switch 1
13 Power Cord 1

3.2: Emergency Stop

The treadmill is equipped with an Emergency Stop System. The system consists of a rectangular stop magnet (located on the upper bridge plastic) attached to a safety stop pull cord.

Before starting a workout, attach the lanyard on the safety stop pull cord to an item of the user's clothing. During a workout, pull the cord to remove the magnet from the bridge. This will immediately stop the treadmill belt.

Note: Test the safety stop pull cord by attaching the lanyard to a user's item of clothing during operation of the treadmill. While the treadmill is on and the console display is active, remove the safety stop pull cord / magnet from the bridge. A message will be displayed on the console similar to "Replace the emergency stop switch". With the safety stop pull cord removed no keys shall function on the treadmill. Place the safety stop pull cord back in place. The treadmill will reset and will be ready for operation.

3.3: Mounting and Dismounting Treadmill

Use the handrails to enhance stability when mounting or dismounting a treadmill. Never mount or dismount the treadmill while the running belt is moving. Use the STOP button on the console to end a workout and stop the running belt. Use the Emergency Stop System to stop the belt immediately.

3.4: User Position

The width of the moving walking/running surface is 22 in. (55 cm). Users must keep their feet within this width while in motion. If standing on the stationary side rails, a user should ensure that his/her feet are completely on the non-moving portion. Never step partially on the moving surface and partially on the non-moving surface simultaneously.
  • Users can adjust their fore-aft position on the moving belt as desired for reach to the console and handles, clearance for arm swing and attachment of the safety stop pull cord. Do not step on the rear roller.
  • It is recommended that the user run within the length of the side handrails to allow usage of the side arms to dismount the belt if needed.

Chapter 4: Assembly Procedure

4.1: Components

Item Description Qty
1 Console 1
2 Bridge Cover 1
3 Accessory Tray 1
4 Bridge Assembly 1
5 Safety Key 1
6 Left Upright Assembly 1
7 Right Upright Assembly 1
8 Cupholder Insert 2
9 Deck Assembly 1
10 Hardware Kit 1

4.2: Hardware

Item Description Qty
1 M10 X 25mm Hex Head Screw 12
2 M10 Star Washer 12
3 #10 X 1/2 Phillips Pan Head Screw 2
4 #6 X 3/8 Phillips Pan Head Screw 4

4.3: Required Tools

Item Description Size Qty
1 Wrench 17mm 1
1/2" 1
2 Socket 17mm 1
1/2" 1
3 Torque Wrench - 1
4 Hex Wrench 8mm 1
5 Rubber Mallet - 1
6 Safety Glasses - 1

4.4: Removing Motor Cover

  1. Remove screws securing motor cover.
    Note: Do not yet attempt to remove shipping pallet.
    Item Description Qty
    1 Motor Cover 1
    2 10-16 X 8 Phillips Screw 2
    3 Shipping Pallet 1
  2. Carefully tilt motor cover upward.
    Item Description Qty
    1 Motor Cover 1
  3. Lift and remove motor cover from unit.
    Item Description Qty
    1 Motor Cover 1
  4. Remove hardware and detach deck assembly from shipping pallet. Discard of hardware and shipping pallet.
    Item Description Qty
    1 5/16-9 X 2-1/2 Lag Bolt 2
    2 5/16" ID Washer 2
    3 Deck Assembly 1
    4 Shipping Pallet 1

4.5: Attach Uprights

  1. Attach left and right upright assemblies. Tighten to 17.5 Nm (12.9 ft-lbs.).
    Note: Be careful not to pinch cables extending out of right upright assembly.
    Item Description Qty.
    1 Left Upright Assembly 1
    2 M10 x 25mm Hex Bolt 8
    3 Lock Washer 8
    4 Right Upright Assembly 1
  2. Attach right upright cable to circuit board.
    Item Description Qty.
    1 Cable 1
    2 Circuit Board 1

4.6: Attach Bridge and Console

  1. Attach bridge assembly to uprights and tighten to 17.5 Nm (12.9 ft-lbs.).
    Note: Be careful not to pinch right upright cables.
    Item Description Qty
    1 10 x 25mm Hex Bolt 4
    2 Lock Washer 4
    3 Bridge Assembly 1
    4 Left Upright Assembly 1
    5 Right Upright Assembly 1
    6 Right Upright Cable 2
  2. Route cables through bridge cable-clips.
    Item Description Qty
    1 Cable-clip 2
    2 Cables 2
    3 Right Upright Assembly 1
  3. Remove screws from bridge and reuse to attach console. Tighten to 17.5 Nm (12.9 ft-lbs.).
    Item Description Qty
    1 10 x 25mm Socket Head Screw 4
    2 Console 1
  4. Attach cables to console. Tuck any excess cable inside console.
    Item Description Qty
    1 Console 1
    2 Cables 5
  5. Attach bridge cover. Tighten to 4 Nm (3 ft-lbs.).
    Item Description Qty
    1 #10 x 1/2 Phillips Screw 2
    2 Bridge Cover 1
  6. Insert cup holders and accessory tray.
    Item Description Qty
    1 Cup Holder 2
    2 Accessory Tray 1
  7. Place magnetic end of safety key into bridge assembly.
    Item Description Qty
    1 Bridge Assembly 1
    2 Safety Key 1

4.7: Attach Motor Cover

  1. Carefully tilt motor cover into position, assuring the rear clips are engaged.
    Item Description Qty
    1 Motor Cover 1
  2. Attach motor cover. Tighten to 4 Nm (3 ft-lbs.).
    Item Description Qty
    1 Motor Cover 1
    2 10-16 X 8 Phillips Screw 2

4.8: Calibration

Before using your treadmill please follow the calibration instructions below. Please stand to the side of your treadmill during calibration.

  1. Turn treadmill on, or if on press the RESET key.
  2. The console will display “PLEASE WAIT” or “WAIT”.
  3. When “PLEASE WAIT” or “WAIT” disappears and the screen is blank press and hold the PAUSE key until “DIAGNOSTICS” appears. Once ”DIAGNOSTICS” appears, press ENTER.
  4. Use the arrow keys to scroll through the diagnostics menu to “CALIBRATION” or “CALIB”.
  5. Press enter to select “CALIBRATION” or “CALIB”.
  6. Press the START key located on the activity zone to begin calibration.
  7. Your treadmill will now automatically cycle through a series of tests including speed and incline adjustments in order to complete calibration.
  8. When successfully completed the console will display “PASS”. If there was an error during calibration the console will display “FAIL”. If a failure occurred press STOP twice and restart the process at Step 1. If failure occurs again take note of the error number display and contact Life Fitness Customer Support Services.
  9. Upon successful completion press the RESET key three times to exit calibration mode.

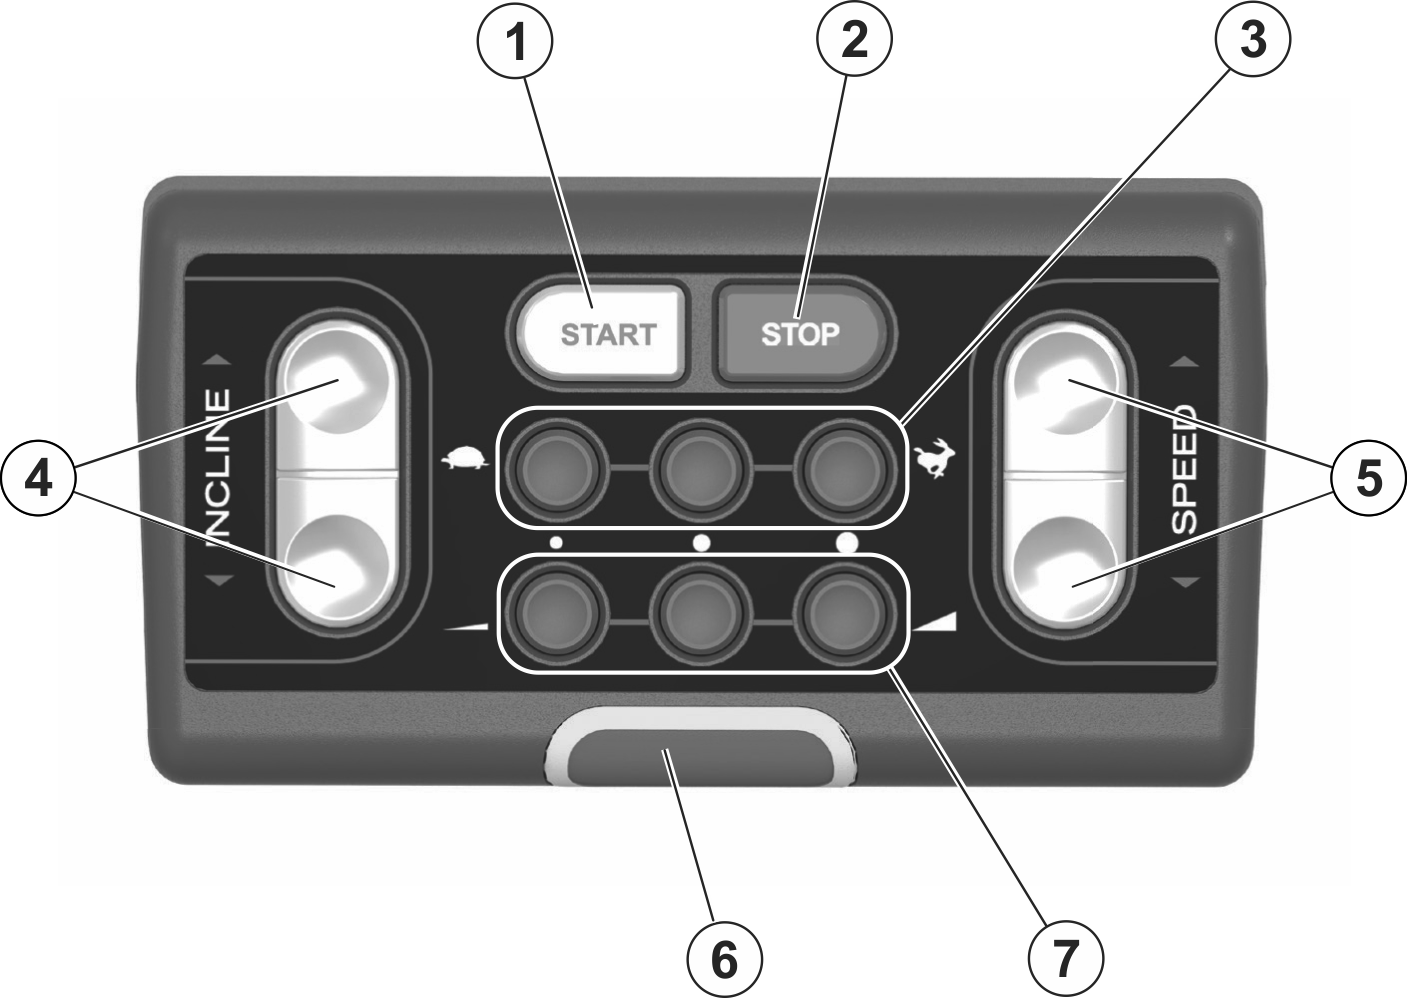
4.9: Activity Zone

  1. Start: Causes the belt to begin moving at 0.5 mph and 0% elevation.
  2. Stop: Causes the belt to slow to a gradual stop. One push pauses the workout, two pushes displays workout information, and three pushes reset the workout.
  3. Walk / Jog / Run: Changes the belt’s speed immediately to a preset value. Initially these buttons are set to change the speed to 2 mph / 3 kph (Walk), 4 mph / 6 kph (Jog) and 6 mph / 9.6 kph (Run). However, the user can set these buttons to new values by first changing the belt’s speed to the desired new value, then holding down the button the new value will be assigned to until the treadmill beeps.
  4. Incline Arrows: Change the belt’s incline gradually, increasing (up arrow) or decreasing (down arrow) the incline by 0.5% each time the user presses an arrow. Maximum incline is 15%.
  5. Speed Arrows: Change the belt’s speed gradually, increasing (up arrow) or decreasing (down arrow) the speed by 0.1 mph each time the user presses an arrow. Maximum speed is 12 mph / 19 km/h.
  6. E-Stop Key: This key connects to the E-Stop Lanyard, which must be clipped to the user’s clothing when the treadmill is in use. Pulling the lanyard so that it comes free of the Activity Zone will stop the treadmill’s striding belt; this serves as a safety feature, stopping the belt should the user stumble or fall. Replacing the key will show the Workout Summary data. Note: Removing the E-Stop key stops the walking belt and incline motor, but all parts are still electrically energized. In case of electrically caused errors, remove the power cord from the electrical outlet.
  7. Low/Med/High: Changes the belt’s incline immediately to a preset value. Initially these buttons are set to change the incline to 1.5% (Low), 3% (Mid) and 5% (High). However, the user can set these buttons to new values by first changing the belt’s incline to the desired new value, then holding down the button the new value will be assigned to until the treadmill beeps.

4.10: Heart Rate Sensors

Item Description Qty
1 Heart Rate Sensor 2

The heart rate sensors are the built-in heart rate monitoring system on the treadmill. During a workout, grasp the sensors that are attached to the activity zone. For an accurate reading, use a comfortable grip. The console displays the heart rate after 15 to 20 seconds.

Chapter 5: Service and Technical Data

5.1: Preventive Maintenance Tips

Note: Safety of the equipment can be maintained only if the equipment is examined regularly for damage or wear. Keep the equipment out of use until defective parts are repaired or replaced. Pay special attention to parts that are subject to wear, as outlined below.

The following preventive maintenance tips will keep the product operating at peak performance:

  • Locate the product in a cool, dry place.
  • Clean the display console and all exterior surfaces with an approved or compatible cleaner (see Approved and Compatible Cleaners) and a microfiber cloth.
  • Long fingernails may damage or scratch the surface of the console; use the pad of the finger to press the selection buttons on the console.
  • Check operation of the emergency stop system once a week.
  • Inspect and vacuum the area directly surrounding and under the unit regularly.
  • Vacuum around the striding belt regularly to keep debris from accumulating.
  • Inspect exterior parts regularly for wear, particularly the striding belt, deck and line cord.
  • Check to make sure the unit is properly leveled.
  • Check the position (centering) of the striding belt.

Note: Normal belt operating position is for the belt to be located within the belt travel indicators on the rear roller guards. Refer to Tracking (Centering) A Striding Belt or contact Customer Support Services for proper alignment instructions.

5.2: Approved and Compatible Cleaners

Two preferred cleaners have been approved by reliability experts: PureGreen 24 and Gym Wipes. Both cleaners will safely and effectively remove dirt, grime and sweat from equipment. PureGreen 24 and the Antibacterial Force formula of Gym Wipes are both disinfectants that are effective against MRSA and H1N1.

PureGreen 24 is available in a spray which is convenient for gym staff to use. Apply the spray to a microfiber cloth and wipe down the equipment. Use PureGreen 24 on the equipment for at least 2 minutes for general disinfection purposes and at least 10 minutes for fungus and viral control.

Gym Wipes are large, durable pre-moistened wipes to use on the equipment before and after workouts. Use Gym Wipes on the equipment for at least 2 minutes for general disinfection purposes.

Contact Customer Support Services to order these cleaners (1-800-351-3737 or email: customersupport@lifefitness.com).

Mild soap and water or a mild non-abrasive household cleaner can also be used to clean the display and all exterior surfaces. Use a soft microfiber cloth only. Apply the cleaner to the microfiber cloth before cleaning. DO NOT use ammonia or acid based cleaners. DO NOT use abrasive cleaners. DO NOT use paper towels. DO NOT apply cleaners directly to the equipment surfaces.

5.3: Preventive Maintenance Schedule

Item Weekly Monthly Biannually
Bottle Holders / Accessory Trays Clean Inspect  
Console Mounting Bolts     Inspect
Console Overlays Clean   Inspect
Drive Belt     Inspect
Emergency Stop Magnet Clean / Inspect    
Ergo™ Front Handlebar Clean   Inspect
Frame Clean   Inspect
Front and Rear Rollers     Inspect
Hardware     Inspect
Leg Levelers   Inspect / Adjust  
Lifepulse Sensors Clean / Inspect    
Motor Cover Clean Vacuum / Clean  
Motor Electronic Compartment     Inspect
Plastic Covers Clean Inspect  
Side Hand Rails Clean   Inspect
Side Step Area Clean Inspect  
Striding Belt Centered Inspect    

5.4: Troubleshooting Treadmill

No power
Probable Cause Corrective Action
ON / OFF switch is not in proper position. Turn the switch to the ON position.
Power source is insufficient. Plug treadmill into an appropriate circuit. Refer to Grounding Instructions.
Note: In North America use a dedicated 15 amp circuit for Consumer Units.
Using a voltmeter, verify power at outlet. If no power exists, reset circuit breaker at panel.
Line cord is damaged. Replace line cord. Contact Life Fitness Customer Support.
Line cord is improperly seated in socket. Inspect power connections at wall outlet and at machine for proper contact.
Striding belt slips off- center.
Probable Cause Corrective Action
Floor surface is uneven. Check levelers and level treadmill. Check striding belt & re-tension as necessary. Refer to How to Adjust and Tension the Striding Belt.
Maximum speed is reduced.
Probable Cause Corrective Action
User is pushing striding belt. This occurs when the runner is running faster than the striding belt will travel, with the result of the striding belt being pushed with the runner’s feet. Instruct users not to push striding belt in either direction.
User is stalling striding belt. This occurs with heavier users at lower striding belt speeds. The striding belt will "stall" if the user is traveling slower than the striding belt.
Striding belt/deck malfunctions. The deck laminate is worn through or the underside of striding belt is glazed over (hard, glossy). Replace belt and deck.
Power source is insufficient. Plug treadmill into an appropriate circuit. Refer to Grounding Instructions.
Note: In North America use a dedicated 15 amp circuit for Consumer Units.
Rubbing sound comes from underneath machine.
Probable Cause Corrective Action
Foreign objects may be stuck underneath the machine. Power down the unit and disconnect AC power. Inspect underneath striding belt and machine. Remove any debris or objects that may cause interference with the treadmill.
Display does not illuminate when machine is powered on.
Probable Cause Corrective Action
  • No power.
  • Loose connection(s).
  • Incorrect console or power supply.
Check all electrical connections for proper attachment.
  • AC outlet and line cord
  • Line cord at treadmill
  • Power switch
  • All console connections
  • All lower electronics connections

Contact Life Fitness Customer Support.

Unit resets randomly or pauses.
Probable Cause Corrective Action
Power source is insufficient. Plug treadmill into an appropriate circuit. Refer to Grounding Instructions.
Note: In North America use a dedicated 15 amp circuit for Consumer Units.
Damaged ground prong is on line cord. Replace line cord.
Line cord improperly seated in electrical outlet. Inspect power connection at electrical outlet and at machine for proper contact.
Emergency stop magnet is not engaged. Re-engage the emergency stop magnet.
Towel or other item may be making contact with stop switch while user is running. Move all possible obstructions off display console and handlebar.
Stop switch is activated with very light pressure or returns slowly after being pressed. Contact Life Fitness Customer Support.
Stop switch cable is not making proper contact.
Main wire harness is pinched.
Ground path is open.

5.5: Troubleshooting the Polar® Heart Rate Chest Strap

Heart rate reading is erratic or absent entirely
Probable Cause Corrective Action
Belt transmitter electrodes are not wet enough to pick up accurate heart rate readings. Wet the belt transmitter electrodes.
Belt transmitter electrodes are not laying flat against the skin. Ensure the belt transmitter electrodes are laying flat against the skin.
Belt transmitter needs cleaning. Wash the belt transmitter with mild soap and water.
Belt transmitter not properly set up. Setup of the belt transmitter is accomplished by initially bringing it with in 1 foot / 30.5 cm of the receiver. The receiver is in the console. After the heart rate is displayed on the console the range is extended to 3 feet / 91.4 cm.
Chest strap battery is depleted. Contact Customer Support Services for instructions on how to have the chest strap replaced.
Abnormally elevated heart rate readings
Probable Cause Corrective Action
Electromagnetic interference from:
  • Television sets and / or antennas
  • Cell phones
  • Computers
  • Cars
  • High voltage power lines
  • Motor driven exercise equipment
Move the exercise equipment a few inches away from the probable cause, or move the probable cause a few inches away from the exercise equipment, until the heart rate readings are accurate.

5.6: How To's

5.6.2: How to Position and Stabilize the Unit

Follow all safety instructions. Move the treadmill to the location in which it will be used.

Note: See How to Adjust and Tension the Striding Belt to center the striding belt.

5.6.3: Safety Clearances

The following information is supplied as regional reference data regarding safety clearances around the exterior of the treadmill.
  • EU: The European EN ISO 20957 Safety Standard requires a 6.5 ft. (2 m) minimum from the rear of the treadmill to any object or surface and at least as wide as the treadmill.
  • U.S. and other regions: The ASTM International (ASTM ) F2115 - 12 Standard recommends the minimum dimensions to be 1.64 ft. (0.5 m) on each side of the treadmill and 6.5 ft. (2 m) behind the rearward most portion of the usable moving surface or 6.5 ft. (2 m) behind the furthest rearward obstruction to emergency egress from the treadmill.
Free area
Item Distance
1 6.5 ft. (2.0m)
2 1.64 ft. (0.5m)

After placing the unit where it will be used, check its stability. If there is even a slight rocking motion or the unit is not stable, determine which stabilizing leg is not resting on the floor. To adjust, loosen the Jam Nut, and turn the Stabilizing Leg until the rocking motion ceases, and both stabilizing legs rest firmly on the floor. Re-tighten the Jam Nut.

Item Description
1 Jam Nut
2 Stabilizing Leg
Note: It is extremely important that the stabilizing leg be correctly adjusted for proper operation. An unbalanced unit may cause striding belt misalignment. A bubble level is recommended to ensure proper leveling.

5.6.4: How to Adjust and Tension the Striding Belt

Do not move the treadmill or place hands under the treadmill while it is plugged into an electrical outlet!

5.6.4.1: Belt Tensioning

A 6 mm Allen wrench is required for this task. The treadmill has access holes in the rear roller guards which allow access to the tensioning bolts. These tensioning bolts make it possible to adjust the tracking and centering of the striding belt without removing the guards.

Item Description
1 6 mm Allen wrench
Note: It is extremely important that the treadmill be correctly leveled prior to any tracking adjustments. An unstable unit may cause striding belt misalignment. See How To Stabilize the Treadmill prior to attempting any rear roller adjustments.

Before proceeding, it is helpful to visualize the pivot point of the rear roller. Each adjustment made to one side of the roller must be met with an equal and opposite adjustment to the other side of the roller to maintain an ideal belt tension at the pivot point.

Item Description
1 Rear Roller
2 Belt
3 Pivot Point of Rear Roller

5.6.4.2: Tracking (Centering) a Striding Belt

Two people are needed to perform this procedure.
  1. Locate the two access holes to the belt tensioning bolts on each of the rear roller guards.
  2. One person stands on the side rails of the treadmill and straddles the belt. This person presses GO and sets the belt speed to 2.5 MPH (4.0 KPH).
  3. If the striding belt has moved to the right, the second person turns the right tension bolt a quarter-turn clockwise and then turns the left tension bolt a quarter-turn counter-clockwise to make the striding belt track back to the center of the roller. If the striding belt has moved to the left, turn the left tension bolt a quarter-turn clockwise and then turn the right tension bolt a quarter-turn counter-clockwise to make the striding belt track back to the center of the roller.
    Note: If the striding belt has moved as far as to the edge of the roller (either right or left side), it must be re-centered per the above procedure.
  4. Repeat the adjustments until the striding belt appears centered. Allow the machine to continue running for several minutes at 4.0 MPH. (6.4 KPH) to observe if tracking remains stabilized.
    Note: Do not exceed one full turn of the adjusting screws in either direction. If after one full turn the belt does not track properly, contact Life Fitness Customer Support. Do not overtighten the tensioning bolts while making belt adjustments. Overtightening of bolts may over stretch and damage the striding belt or roller.

5.6.4.3: Tensioning an Existing Striding Belt

  1. Press GO and operate the treadmill for five minutes at 5.0 MPH (8.0 KPH).
    Note: Do not run or walk on belt!
  2. Reduce the speed to 2.0 MPH (3.2 KPH). Walk on the treadmill. Tightly grip the handrails and apply force with feet on the striding belt near the motor cover against the moving belt direction. If the belt slips, continue to Step 3. If it does not slip, the tension is correct.
  3. Using the STOP key, stop the treadmill. Turn the belt tensioning bolts a quarter-turn clockwise for each side.
  4. Repeat STEPS 2 and 3 until the belt no longer slips. Do not exceed one full turn (four quarter turns) per side when adjusting the belt tensioning bolts.
  5. Press GO, operate the treadmill at 2.0 MPH (3.2 KPH) and check to insure proper tracking (see Tracking (Centering) A Striding Belt). If the striding belt drifts to the left or right see Centering an Existing or New Striding Belt .
    Do not overtighten the tensioning bolts while making belt adjustments. Overtightening of bolts may over stretch and damage the striding belt or roller bearings. Do not exceed one full turn of either bolt in either direction.

Chapter 6: Specifications

6.1: Specifications

Designed Use Home EN ISO 20957 Class H
Maximum User Weight 400 lbs. / 181 kg
Speed Range 0.5 - 12.0 MPH (0.8 - 19 KPH) in 0.1 increments
Elevation Range 0% - 15% (in 0.5% increments)
Drive Train DC motor with variable speed controller
Motor Size 3 HP continuous duty DC
Power Requirements See Electrical Requirements for requirements outside the U.S.
Dedicated 120 volt, 20 amp (U.S)
120 volt, 15 amp (U.S.)
Rollers Front: 2.6” (67mm) precision crowned
Rear: Back: 2.0” (50mm) precision crowned
Striding Belt 60” Length x 22” Width (152 cm Length x 55 cm Width) multi-ply
Waxing System Lubricant-infused Striding Belt
Deck Type 3/4" medium density reversible fiberboard
Handrail Ergo Crossbar with side handrails
Stop Systems
  • Red magnetic lanyard emergency stop system
  • Stride Sensor
Heart Rate Monitoring Systems Patented Lifepulse™ digital contact heart rate and Polar® telemetry compatible heart rate monitoring system
  Physical Dimensions Shipping Carton Dimensions
Length 79.5 in. / 202 cm 90 in. / 229 cm
Width 32 in. / 81 cm 34.5 in. / 88 cm
Height 61 in. / 155 cm 22 in. / 56 cm
Weight 341 lbs. / 155 kg (with console) 436 lbs. / 198 kg

Chapter 7: Warranty

7.1: What is Covered

This LIFE FITNESS consumer exercise equipment product is warranted to be free of all defects in material and workmanship.

7.2: Who is Covered

The original purchaser or any person receiving the product as a gift from the original purchaser.

7.3: How Long is it Covered

Limited Lifetime 10 Years 7 Years 1 Year
Frame and Lifesprings Drive Motor Electrical and Mechanical Parts Labor

7.4: Who Pays Shipping and Insurance for Service

If the Product or any warranted part must be returned to a service facility for repairs, Life Fitness will pay all shipping and insurance charges during the warranty period (within the United States only). The purchaser is responsible for shipping and insurance charges after the warranty has expired.

7.5: What We Will Do To Correct Covered Defects

We will ship to you any new or rebuilt replacement part or component, or at our option, replace the Product. Such replacement parts are warranted for the remaining portion of the original warranty period.

7.6: What is Not Covered

Any failures or damage caused by unauthorized service, misuse, accident, negligence, improper assembly or installation, debris resulting from any construction activities in the Product’s environment, rust or corrosion as a result of the Product’s location, alterations or modifications without our written authorization, or by failure on your part to use, operate and maintain the Product as set out in your Operation Manual.

All terms of this warranty are void if this product is moved beyond the continental borders of the United States of America (excluding Alaska, Hawaii and Canada) and are then subject to the terms provided by that country’s local authorized Life Fitness representative.

7.7: What You Must Do

Retain proof of purchase. use, operate and maintain the Product as specified in the Manual; notify the place of purchase of any defect within 10 days after discovery of the defect; if instructed, return any defective part for replacement or, if necessary, the entire Product for repair. Life Fitness reserves the right to decide whether or not a product is to be returned for repair.

7.8: User Manual

It is VERY IMPORTANT THAT YOU READ THE MANUAL before operating the RRR Treadmill . Remember to perform the periodic maintenance requirements specified in the Manual to assure proper operation and your continued satisfaction.

7.9: Product Registration

Register online at https://lifefitness.com/home/support/product-registration. Our receipt assures that your name, address and date of purchase are on file as a registered owner of the Product. Being a registered owner assures coverage in the event you lose your proof of purchase. Please retain your proof of purchase, such as your bill of sale or receipt.

7.10: How to Get Parts and Service

Refer to the Corporate Headquarters section of this manual for your local service contact information. Reference your name, address and the serial number of your Product (consoles and frames may have different serial numbers). They will tell you how to get a replacement part, or, if necessary, arrange for service where your Product is located.

7.11: Exclusive Warranty

THIS LIMITED WARRANTY IS IN LIEU OF ALL OTHER WARRANTIES OF ANY KIND EITHER EXPRESSED OR IMPLIED, INCLUDING BUT NOT LIMITED TO THE IMPLIED WARRANTIES OF MERCHANTABILITY AND FITNESS FOR A PARTICULAR PURPOSE, AND ALL OTHER OBLIGATIONS OR LIABILITIES ON OUR PART. We neither assume nor authorize any person to assure for us any other obligation or liability concerning the sale of this Product. Under no circumstances shall we be liable under this warranty, or otherwise, of any damage to any person or property, including any lost profits or lost savings, for any special, indirect, secondary, incidental or consequential damages of any nature arising out of the use of or inability to use this Product. Some states do not allow the exclusion or limitation of implied warranties or of liability for incidental or consequential damages, so the above limitations or exclusions may not apply to you. Warranty coverages and terms may differ outside the United States. Please contact the Life Fitness office servicing your country (contact information found at the front of this manual) or visit the applicable local Life Fitness website to receive the specific warranty information for your country.

7.12: Changes in Warranty Not Authorized

No one is authorized to change, modify or extend the terms of this limited warranty.

7.13: Effects of State Laws

This warranty gives you specific legal rights, and you may have other rights which vary from state to state and country by country.

7.14: How to Obtain Product Service

  1. Verify the symptom and review the operating instructions. The problem may be unfamiliarity with the product and its features and workouts.
  2. Locate and write down the serial number of the unit; see below image for location.
  3. Contact Customer Support at http://www.lifefitness.com.

7.14.1: Serial Number Location

Item Description
1 Serial Number Label